Create an AWS website & Bastion Host with Terraform

STATIC WEB SERVER AND A bastion host (jump server)

Requirements & installation of Terraform

The following must be installed and configured for this exercise:

Install AWS CLI

Configure AWS CLI

Install Terraform

Note:  You don't have to install the requirements on your desktop.  You can use a virtual desktop for your development environment using tools like Oracle's virtualbox or VMware Workstation or Player, or Mac Fusion or Mac Parallels.  Perhaps an AWS Workspace or AWS Cloud 9 environment. 

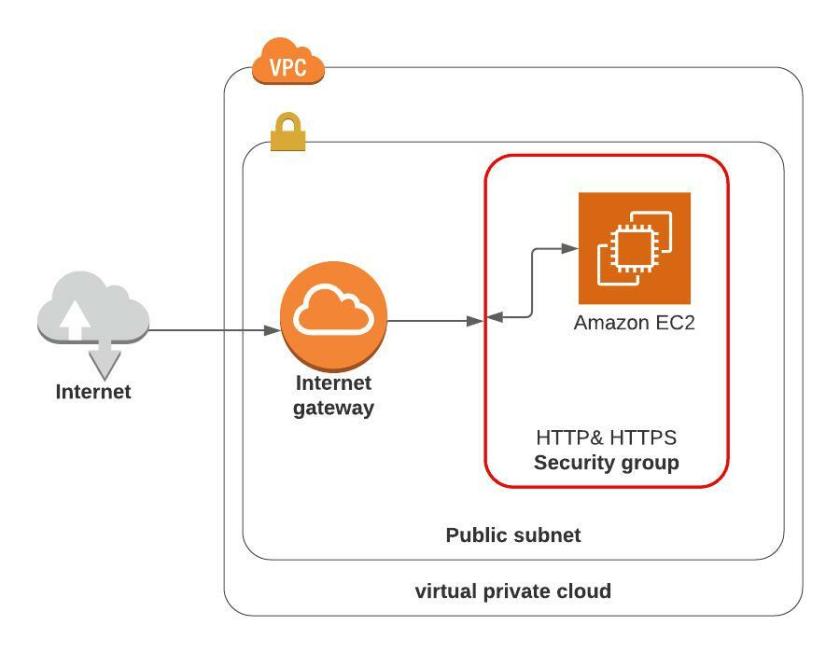
This example creates a static web server and a controller (otherwise called a bastion host or even a jump server). I like to call it a controller because, in later exercises, I will use the controller to execute an Ansible configuration of public and private AWS EC2 servers. For now, though, this exercise keeps it simple and creates a jump server (bastion host):

  • It demonstrates restricting SSH & HTTP traffic.
    • In the case of the web server, it allows SSH only from the controller (jump server)
    • In the case of the web server, it allows HTTP only from My Public IP address.
    • In the case of the controller, it allows SSH only from My Public IP address.
  • And this example creates a very real static webserver.

It is a common practice to put Web servers into a private network and then provide a reverse proxy or load balancer between the web server and the internet. Private servers can not be directly accessed from the internet. To access a private server for administration, it is common to use a bastion-host (aka jump server) and the SSH to the jump server and from the jump server SSH into private servers.

This exercise uses only one public subnet and technically doesn’t require a bastion-host (aka jump server) for server administration. Creating a VPC with a private network requires a NAT gateway or NAT instances placed into a public subnet so that the private subnet can pull updates or download software from the internet. A NAT gateway will incur costs in AWS even with a Free Tier plan. Thus I’m writing this code to give an example of a jump server that can be used in a Free Tier exercise that will incur no cost.


The code for this VPC is the same as the previous exercise, and its code method is explained in the last exercise. You can copy the contents of the previous exercise and make a few changes to each file. There are two extra files in this exercise, the S3 policy file and the files for the static Website.

Or you can clone the code for this exercise from my Github repository.


VPC.tf

Variables.tf

The code for variables.tf is almost the same as the previous exercise. The change to variables.tf is the addition of a variable for an AWS key pair and a variable for a Public IP Address.

You will need to configure the “ssh_location” with an IP address. The IP address will be your public IP address. If you don’t know your public IP address, open a browser and type into your browser’s address space, “what is my IP address” the browser will then show your public IP address. Change the variable setting to “your IP address with a /32” subnet mask. (i.e. “1.2.3.4/32”)

This exercise provides a connection to the new EC2 instance named “controller” using SSH. So be sure to create an AWS EC2 Key Pair within the region you will be using for this exercise, and update the variable “key” with your existing or EC2 key pair name. (i.e. an EC2 Key Pair name of testkey.pem becomes “testkey” for the name.


Main.tf

The code for main.tf in this exercise is almost the same as the previous exercise, except we are adding an EC2 instance named controller. Take note of the controller’s security group, which is using a new security group called “controller-sg.” We’ll discuss that security group in the Security_groups.tf discussion below.

Another change is the outputs. We are adding the “private_ip” of the web server in the outputs because we’ll need the private IP for an SSH connection by connecting to the controller and jumping from the controller into the webserver—output for the controller’s Public IP address.

Also, the controller has a unique “bootstrap-controller.sh” file. It doesn’t do much; it just runs a script for updating OS and apt packages upon launching the instance.

The “bootstrap-web.sh” is different from the first exercise. It runs an update & upgrade of the OS and apt packages upon launching the instance. The “bootstrap-web.sh” also installs Apache and AWS CLI and copies some files I’ve created for a static website from an S3 bucket into Apache’s folder /var/www/html.


Security_Groups.tf

Our code creates two security groups, “web-sg” and “controller-sg.”

The first security group, “web-sg,” allows HTTP into the webserver but only from your public IP address. The code establishes a rule that will enable SSH, but only from your IP address to the controller, and then allows a jump from the controller to the Web server. This makes our web server a bit more secure in any environment because it restricts who and how an admin can establish an admin session on the webserver.

Take note of the unique method of controlling ingress within the web security group “web-sg.” In the ingress section, I have replaced “cidr_blocks” with “security_groups.” This is basically stating any resource assigned to the security group “controller-sg” is allowed an ingress connection (in this case, SSH).

Using security_groups instead of a “cidr_block” as an ingress rule provides an excellent method of controlling ingress to our EC2 instances. As you know, assigning a “cidr_block” is setting a group of IP addresses. Most code examples published as examples, show an ingress of 0.0.0.0/0, allowing anyone or any device inbound access. Opening your inbound traffic to the entire internet into our test environment might be a very convenient way of writing code examples. Still, though, it most certainly is not a good practice.

As stated earlier, both EC2 instances in this exercise are in a public subnet and do not require a jump server. I prefer to write exercises that simulate potential real-world examples as early in the coding practice as reasonably possible. One of those practices is using a security group as ingress to web servers instead of a “cidr_block.”


Using S3 bucket repository for website files

AWS S3 is a great place to store standard code for a team to utilize as shared public storage. Therefore we are creating an S3 bucket that will hold our static website files. This code will copy the files from an S3 bucket into our web server content folder.

So, we’ll copy the website files into an S3 bucket. And create a profile that allows an EC2 instance to read and copy files from S3.

Create an S3 bucket using AWS CLI

We need an S3 bucket to hold the website files. Go ahead and create a bucket using the AWS Management Console or use AWS command-line interface to create a new bucket.

Github sample website files

My Github repository has a file called “Static_Website_files.zip.” You are most certainly invited to unarchive the file and use it for your test website or create your static website files. Just know you’ll, of course need to unarchive the zip file contents before using the content.

s3_policy.tf

Copy website files into the new S3 bucket

The AWS command-line interface is a quick way to get the files into the bucket. I have a file on Github that you can download and use as the files for the Website. Download and unarchive the file “Static_Website_files.zip” into a temporary folder and use the AWS S3 copy command to copy the files into the new bucket. Or use the AWS Management Console to copy the files into the bucket. Once you have the files in S3, the bootstrap user data of the EC2 Instance “web” will automatically install the website files in the apache folder /var/www/html from your bucket.

Configuration – reminders

Be sure to configure the following in variables.tf
  • Place your public IP address as the default IP for the variable “ssh_location.”
  • Place your regional EC2 Key Pair name as the default for variable “Key.”
Be sure to configure the S3 bucket name in s3_policy.tf
  • Don’t forget to create an S3 bucket and place the Website static files into the bucket
  • Don’t forget to place the “ARN” of the S3 bucket into the S3_policy.tf

Launching the VPC and Web Server

After installing the requisite software, requisite files, and configuring the variables.

Run the following commands in terminal

  • Terraform init
    • Causes terraform to install the necessary provider modules, in this case, to support AWS provisioning
  • Terraform validate
    • Validates the AWS provisioning code
  • Terraform Apply
    • Performs the AWS provisioning of VPC and Web Server

After Terraform finishes provisioning the new VPC, Security Groups and Web Server, it will output the Public IP address of the new public server in the terminal window. Go ahead and copy the IP address, past it into a browser, and you should see something like the image below:

Once you have finished with this example, run the following command:

  • Terraform Destroy (to remove VPC and Web Server)

It goes without saying, but it has to be said anyway. This is not for production!

All public websites should have some type of application firewall in between the Web Server and its internet connection!

It is a good idea to remove an EC2 instance when you are finished with the instance, so as not to incur costs for leaving an EC2 running.


Terraform – Very basic AWS website

New VPC, Public Subnet & a Web Site

Requirements & installation of Terraform

The following must be installed and configured for this exercise:

Install AWS CLI

Configure AWS CLI

Install Terraform

Note:  You don't have to install these requirements into your desktop.  It is certainly quite feasible to use a virtual desktop for your development environment using tools like Oracle's virtualbox or VMware Workstation or Player, or Mac Fusion or Mac Parallels.  Perhaps an AWS Workspace or AWS Cloud 9 environment. 

We’ll create a very simple website using Terraform. It’s not really good from a production perspective, except to give a rudimentary and easy to read example of provisioning infrastructure and a website using Terraform.

I have placed all of the code in a GitHub, if you are not into typing all of the code. Her is the link: One_Public_Subnet_Basic_Web_Server

First setup a new folder. You can either use GIT to clone the code from GitHub or type in create your own files as show below:

VPC.tf

This file will create a VPC, we’ll give it a name, mark it as a “Test” environment and create one public Subnet and an Internet Gateway so that we can get Internet traffic in and out of our new AWS network.

So first a bit of code to create the VPC

resource "aws_vpc" "my-vpc" {
  cidr_block           = var.vpc_cidr
  enable_dns_support   = true
  enable_dns_hostnames = true
  tags = {
    Name  = "My VPC"
    Stage = "Test"
  }
}

It states that it is an AWS_VPC, then we provide the VPC IP address range.

A resource block declares a resource of a given type (“aws_vpc”) with a given local name (“my-vpc”). The name is used to refer to this resource from elsewhere in Terraform coding.
The resource type and name together serve as an identifier for a given resource and so must be unique within a module.
Within the block body (between { and }) are the configuration arguments for the resource itself. Most arguments in this section depend on the resource type.

Add a few Tags to most of your terraform resources, it is an excellent way of tracking AWS infrastructure and resources. Not really a big deal if this was to be the only VPC and a few resources. However “TAGS” become really important as an organization might have multiple test environments, multiple Development and QA environments and multiple production environments. By setting tags we can keep track of each project, the type of environment and recognizable names for the many systems. So a standard practice of adding meaningful tags, is a really good idea!

A bit of code to create an Internet Gateway

resource "aws_internet_gateway" "my-igw" {
  vpc_id = aws_vpc.my-vpc.id
  tags = {
    Name = "My IGW"
  }
}

We are coding a resource as a “aws_internet_gateway” and the reference name of “my-igw”. You can provide any name you wish to use. Just know that if you are going to make a reference to the internet gateway in any other terraform code, you must use the exact same name (referenced names are case sensitive and symbols like dash versus underscore sensitive).

ADD One public Subnet

resource "aws_subnet" "public-1" {
  vpc_id                  = aws_vpc.my-vpc.id
  map_public_ip_on_launch = true
  availability_zone       = var.public_availability_zone
  cidr_block              = var.public_subnet_cidr

  tags = {
    Name  = "Public-Subnet-1"
    Stage ="Test"
  }
}

Add route to internet gateway

resource "aws_route_table" "public-route" {
  vpc_id = aws_vpc.my-vpc.id

  route {
    cidr_block = "0.0.0.0/0"
    gateway_id = aws_internet_gateway.my-igw.id
  }
  tags = {
    Name = "Public-Route"
  }
}

Associate the route to Internet Gateway to the public subnet

resource "aws_route_table_association" "public-1-assoc" {
  subnet_id      = aws_subnet.public-1.id
  route_table_id = aws_route_table.public-route.id
}

That completes the VPC.TF file


Variables.tf

The variables file for Terraform can actually have almost any name, names like vars.tf, my-vars.tf, my-variables.tf. You can even embed the variables within the VPC.TF file if you so desire, so long as the variables are declared in a file within the same folder. The most important element to learn is not just about the variables, but keeping sensitive variable data secure. Sensitive data should go into a file like “tvars.data”. And add “tvars.data” into the .gitignore file so that our sensitive variables doesn’t get posted in public github repository. Additionally, Hashicorp has a product offering called “Vault”. If multiple personnel are using the same Test, Development, QA or production environment, it is a recommended practice to protect sensitive variable data like AWS credentials, AWS Key names, and other sensitive data!

This is a very basic, non-production example with no sensitive data, so in this case we can create a variables.tf file without worry about keeping any data safe.

variable "region" {
    type=string
    description="AWS region for placement of VPC"
    default="us-west-1"
}

variable "vpc_cidr" {
    type=string
    default="10.0.0.0/16"
}

variable "public_subnet_cidr" {
    type=string
    default="10.0.1.0/24"
}

variable "public_availability_zone"{
    type = string
    default="us-west-1a"
}

variable "instance_type" {
    type = string
    default = "t2.micro"
}

That completes the variables file


Main.tf

Once again the name the name of the file is not important. We could call it MyWeb.tf or Web.tf. We could even put the VPC code, the variables code and the Web code, (all of the code), into one big file. Breaking up the code into separate files, just makes it modular coding that is reusable and easier to review.

provider "aws" { region = var.region}

Notice we are declaring the AWS Region in this block of code. WHAT? Shouldn’t this be declared when we created the VPC itself? Again, as long as it is declared, it almost doesn’t matter which file you place the declaration of AWS Region.

Notice also in this short bit of code:

We are stating the provider as “AWS”, this tells Terraform the backend code that will be downloaded from Hashicorp repositories in support of this instance of Terraform provisioning. It might also be a good idea to include the release of Terraform as a requirement within the code. Over time, Hashicorp changes and deprecated elements of Terraform. Such that over time, your code may no longer work if you pull down the “latest Terraform backend” from Hashicorp repositories.

Versioning Terraform Code

Code similar to the following might be a good idea:

terraform {required_version = ">= 1.04, < 1.05"}

This stipulates the use of Terraform version “1.04”, which is a representation of the version utilized when the code was tested and released. Future versions of Terraform may not work because of deprecation, but this version for sure works because it was tested using Terraform version 1.04.

I have not included this statement in my code, because after all, it is simply an example, not coding for any project or production system. We shall see if over time, something changes and it no longer works 🙂

Using SSM parameter to obtain AMI ID

data "aws_ssm_parameter" "ubuntu-focal" {
  name = "/aws/service/canonical/ubuntu/server/20.04/stable/current/amd64/hvm/ebs-gp2/ami-id"
}

You will see a tremendous amount of “Infrastructure as Code” declaring the AWS Image ID to use for an EC2 resource as something like ami-0d382e80be7ffdae5 for example. Sometimes it is hardcoded into the “aws_instance” block, or most times you’ll see it declared as a variable.

Sometimes a “Infrastructure as Code” creates a mapping (a list) of images where one of the images can be used dependent on the region. I’ve seen code where literally an AMI-ID is listed for each AWS region across the globe. Not unlike a phone book listing. This type of approach is used in Terraform, Cloudformation, Ansible, Chef and Puppet, most anywhere with provisioning with Infrastructure as Code.

This type of mapping of an ID per region, might be required. If for example, creating a custom “Golden Image”. It is not unusual to create and release an AMI ID as the gold standard to use for a deployment. The “Golden Image” is pre-configured with a specific version of Python, Apache or NGINX for example. The custom image is then stored as an EC2 AMI in AWS. To use as the AMI ID for a specific project(s) and you’ll need a different image ID depending on the region.

I have already created and will be posting in the near future, examples of scalable web servers. Using a custom AMI image with specific versions of Python, Apache2 and another AMI for MySQL backends. In those examples, I will be using a specific “golden image” with versioning and release statements.

For now though, I just need the latest version of Ubuntu server. You can see a good write up on how to pull a specific Ubuntu image. You’ll find the document by Ubuntu, at this link: Finding-ubuntu-images-with-the-aws-ssm-parameter-store.

This method is a Terraform code that connects into AWS API to “Get Data”. In this case an aws_ssm_parameter. And specifically in this case getting an image for Ubuntu server 20.04 stable release.

This bit of code will get the AMI ID, for the AWS Region specified earlier.

I could’ve just as easily have gotten an Amazon Linux 2 AMI ID as follows:

data "aws_ssm_parameter" "linuxAmi" {
  name     = "/aws/service/ami-amazon-linux-latest/amzn2-ami-hvm-x86_64-gp2"
}

Caution: Do not use an Amazon Linux example above because the bootstrap.sh, User Data (see below) is specifically using Ubuntu server commands language . Make sure to sure to use the UBUNTU SSM Parameter above. I am simply demonstrating that you can get other Linux kernels, using the same process.

Creating the aws_instance

resource "aws_instance" "web" {
  ami                    = data.aws_ssm_parameter.ubuntu-focal.value
  instance_type          = var.instance_type
  subnet_id              = aws_subnet.public-1.id
  vpc_security_group_ids = ["${aws_security_group.web.id}"]
  user_data = file("bootstrap.sh")
  tags = {
    Name  = "Basic-Web-Server"
    Stage = "Test"
  }
}

Now we are calling for the creation of an AWS Instance with the name “web”

In the AWS resource block, we’ll need to stipulate at the very least an AMI-Id, the instance type, the subnet placement and a security group.

In this case we are using the AMI-Id pulled earlier. ami=data.aws_ssm_parameter.ubuntu_focal.value. Where “ubuntu_focal” is referencing the bit of code that pulls the code from AWS.

 data "aws_ssm_parameter" "ubuntu-focal" (this pulls the AMI-ID data from AWS - line 8 of this code)
 ami= data.aws_ssm_parameter.ubuntu-focal.value (this uses the AMI-ID Value that was pulled from AWS in line 8)

The instance type will be a t2.micro (free tier) referenced in the variables.tf file. The subnet references the subnet created in VPC.tf that is named “public-1”. The security group is referencing the security group created in “security_groups.tf” (see the next section below).

User Data

User data is a bit of code that executes within the AWS Instance itself. In this case, code the Web server executes when it is first built by Terraform provisioning. There is a number of ways to write this script which executes when the AMI instance is launched. We could write the script like this:

  user_data              = <<-EOF
                            #!/bin/bash
                            apt update
                            apt upgrade -y
                            hostnamectl set-hostname Web                            
                            EOF

Or we can put the script into a file and call the file itself like this:

user_data = file("bootstrap.sh")

For this example we are using the “bootstrap.sh” example. Technically we can use any name, so long as the script itself is properly coded. We could use “boot.sh” for example.

Add some tags and we are near complete with this file.

The final lines, is an instruction for Terraform to output AWS data. The Terraform code use the AWS API to pull data about our new Web server and display that data in the terminal when Terraform completes provisioning our infrastructure. In this case we want only the public IP

output "web" {  value = [aws_instance.web.public_ip] }

Note: If you leave off the last bit, “public_ip” the output will display all of the known data about the new web server. However, as can be seen in future examples, being specific about output data makes it referenceable in other Terraform modules. So in this case we want the public_IP.

That completes the Main.tf file


Lastly, Create the security_groups.tf file

Security groups resource “aws_security_group” at the very least requires a name, in this case “web-sg”, the vpc_id and an ingress rule and egress rule. Once again, about the Name of the resource, it is important to remember, that referencing the security group the name itself is case sensitive and it symbol sensitive like dash instead of underscore.

resource "aws_security_group" "web-sg" {
  vpc_id      = aws_vpc.my-vpc.id
  description = "Allows HTTP"

  ingress {
    from_port   = 80
    to_port     = 80
    protocol    = "tcp"
    cidr_blocks = ["0.0.0.0/0"]
  }
  egress {
    from_port   = 0
    to_port     = 0
    protocol    = -1
    cidr_blocks = ["0.0.0.0/0"]
  }
  tags = {
    name  = "SecurityGroup-Web"
    Stage = "Test"
  }
}

Configuration

Note: The variables do not have to be changed if you are ok with running a new VPC and Web server out of US-West-1 region

Once the requirements stated above are installed, and the VPC.tf, main.tf, security_groups.tf and variables.tf are created in the same folder you are ready to launch. Or, you can simply clone the GITHUB repository into a folder.

  • Edit the variable for your choice for AWS Region (currently, the default is “us-west-1”).
  • Edit the CIDR blocks if you want to use different address range for your new VPC
  • Edit the Instance type if you want to use a different instance type (note t2.micro is the only one you can use for free tier)

Launching the VPC and Web Server

After installing the requisite software, requisite files and configured the variables.

Run the following commands in terminal

  • Terraform init
    • Causes terraform to install the necessary provider modules, in this case to support AWS provisioning
  • Terraform validate
    • Validates the AWS provisioning code
  • Terraform Apply
    • Performs the AWS provisioning of VPC and Web Server

After Terraform finishes provisioning the new VPC, Security Group and Web Server, it will output the Public IP address of the new public server in the terminal Window


Open a browser and you should see the welcome to nginx as shown below:


Clean up

Once you have finished with this example run the following command:

  • Terraform Destroy (to remove VPC and Web Server)

It goes without saying, but it has to be said anyway. This is not for production!

All public websites should have some type of application firewall in between the Web Server and its internet connection!

It is a good idea to remove an EC2 instance when you are finished with the instance, so as not to incur costs for leaving an EC2 running.


Using AWS CLI to create a static WebSite on S3

To create a bucket, you must register with Amazon S3 and have a valid AWS Access Key ID to authenticate requests. By creating the bucket, you become the bucket owner.

Not every string is an acceptable bucket name. For information about bucket naming restrictions. See Bucket naming rules

Step 1 – Choose where you want to run AWS Command Line Interface (CLI)

There are several methods to using AWS CLI

  1. My Choice – Install prerequisite utilities and AWS CLI on your desktop or laptop.
  2. An alternate method – Use AWS Cloud9. An EC2 instance is created and configured by the AWS Cloud9 service. Cloud9 configuration of an EC2 instance comes with the prerequisite utilities and AWS CLI already configured for use within your AWS account. Cloud9 may require enabling the AWS Toolkit in Cloud9 to manage some services. The welcome screen discusses why and how to use the toolkit). AWS Cloud9 is free to use for new accounts using the Free Tier option.
  3. Another method – Create a virtual machine locally, then install the prerequisite utilities and AWS CLI installed into the virtual machine.
    • For Windows machines – Virtual Box, VMware Workstation, or VMWare Player.
    • For Mac’s you can use Virtual Box, VMware Fusion or Parallels desktop
    • For Linux machines use Virtual Box or VMware Workstation Player
  4. Another method – Use a Docker Container and run CLI from the container
  5. Another tool to possibly use is Dockers Dev Environment which at the time of this writing is in Preview Mode, I haven’t tried the preview yet.

Note: A fun activity is using Hashicorp/Vagrant to automate the installation and configuration of virtual machines. Creating a standard Dev. Environment amongst developers. By using Vagrant the vagrant file (script) creates and configures a virtual machine exactly the same way on Macs, Windows and Linux machines, using Vagrant and Virtualbox. Thus, assuring everyone is using the same version of Python for example! Vagrant does work with VMware Workstation or VMware fusion (at cost).

Note2: Another fun activity is using HashiCorp/Packer to create and create a standard Docker Image for developers to use as a standard docker image. Like Vagrant, Packer scripts the creation of an image, and the installation of specific versions of the requisite utilities for AWS CLI. An example, is to use these specific version of AWS CLI and Python (aws-cli/2.1.29, Python/3.7.3) when creating and configuring a docker image.

Note3: Both Vagrant and Packer use "provisioners", a built in command to configure a virtual machine or docker image. I personally like to use Hashicorp/Ansible for the configuration, in my opinion Ansible is more intuitive, easier to use, more immutable and declarative as a configuration tool.

The primary difference between Vagrant and Packer, is that Vagrant creates a Virtual Machine, whereas Packer creates a Docker image. A Virtual Machine can perpetually save all of the local files by simply suspending a virtual machine when finished for the day, whereas Docker images needs to map to a local directory for persistent storage. I like using a virtual machine (possibly even with shared folders), but that is my old school methods getting in the way perhaps 🙂


The Difference in the alternatives above

The primary difference between installing AWS CLI on your desktop or laptop or using one of the alternative methods above is all about controlling your utility versions. An Example, two members of a team, use AWS CLI installed on their desktops. Team member “Tom Jones” is running AWS CLI Version 1 with Python Version 2.7, and member “John Thomas” is running AWS CLI Version 2 with Python Version 3.8. Different versions behave differently, what Tom can or can’t accomplish, most likely will be a different experience than John’s.

Cloud 9, Virtual Machines, or Docker Images, can and should have specific versions of utilities maintained by agreement amongst members of the team. Everyone will be able to accomplish the same tasks, share the same git repositories, etc., with the assurance of the same experience and outcomes.

Step 2 – Install and configure AWS CLI

This topic provides links to information about how to install, update, and uninstall version 2 of the AWS Command Line Interface (AWS CLI) on the supported operating systems.

AWS CLI version 2 installation instructions:

Note: the above instructions are links to AWS documentation. I’m planning on writing up the use of Packer for Docker and Vagrant for virtual machines along with Ansible configurations, as future posts.

Step 3 – Create a Bucket

When you have configured your AWS CLI environment, you should be able to run the following command.

aws s3 mb s3://bucket-name

Step 4 – Enable the bucket as a static website

aws s3 website s3://bucket-name/ –index-document index.html –error-document error.html

Step 5 – Apply the policy to the new bucket

Create a new local file “bucket_policy.json” with this content:

{
    "Version": "2012-10-17",
    "Statement": [
        {
            "Sid": "PublicReadGetObject",
            "Effect": "Allow",
            "Principal": "*",
            "Action": "s3:GetObject",
            "Resource": "arn:aws:s3:::bucket_name/*"
        }
    ]
}

Make sure to replace the bucket_name in the above content with your new S3 bucket name

Execute the following command in your command-line interface (CLI)

aws s3api put-bucket-policy –bucket bucket-name –policy file://./bucket_policy.json

Step 6 – Create the index.html and error.html files

Create an index.html file. If you don’t have an index.html file, you can use the following HTML to create one (using any text editor):

Save the index file locally. The index document file name is case-sensitive. For example, index.html and not Index.html.

To configure an error document Create an error document, for example, error.html (using any text editor):

Save the error document file locally. Remember, The file name is case sensitive

Step 7 – Copy the files into your S3 bucket

aws s3 cp index.html s3://bucket-name
aws s3 cp error.html s3://bucket-name

S3 static WebSite should be operational

The website will be at the following address:

bucket-name.s3-website.your-aws-region.amazonaws.com

Create a Web Server using an EC2 Instance


Connect into your EC2 instance:
Goto Amazon’s EC2 connect guide as they have a great documentation on your choices of how to connect into an EC2 instance.

Install Apache Service and start the service

Configure your own HTML page


Assuming that the HTTP & HTTPS security group has already been created, it needs to be assigned to this EC2 Instance

  • Goto the AWS EC2 dashboard
  • Click on Instances Running in the Resources section
  • Select the EC2 Instance and then Click Actions button
  • Within the drop down menu choose to expand Security
  • Select Change Security Groups
  • In the Associated Security Groups, click in the “Select security groups” box
    Note: I don’t understand why the User Interface (UI) shows the “Select security groups” as though it is greyed out, but there you have it, click in that box, and a drop down of available security groups will be shown
  • If you followed the module Create HTTP and HTTPS security Group you should have a security group named “HTTP & HTTPS”, select the HTTPS & HTTPS security group and the box will change to the actual ID of the security group ID
  • Then click Add Security Group
  • Then click Save

Open a browser window and enter the URL to access the Web Server (it is the public IP address of the EC2 instance).

Note: get the public IP address from the EC2 Management console Instance details

You should see the following:


Caution: It is a good idea to remove an EC2 instance when you are finished with the instance, so as not to incur costs for leaving an EC2 running.

It goes without saying, but it has to be said anyway. This is not for production!

All public websites should have some type of application firewall in between the Web Server and its internet connection!

As well it should be monitored and have event and incident management in place. The list of things that will make a better architecture for a web site continues! However, enough said at this time!

Launch an EC2 instance and Connect

This assumes you have left the default VPC in place or that you have created your own VPC with a public network. Also, be sure to select the region you want to create a EC2 instance.

To launch an EC2 instance

  • Sign in to the AWS Management Console
    • Choose the region you wish to launch
  • Choose EC2 Dashboard, and then choose Launch instance
  • Choose the Amazon Linux 2 AMI
  • Chose the t2.micro instance type (free tier)
  • Click next to configure instance details
    • Network: Choose the VPC with a public subnet (either default VPC or one you’ve created)
    • Subnet: Choose an existing public subnet
    • Auto-assign Public IP: Choose Enable
  • Choose next to configure storage
    • Keep the defaults and add a tag of your choosing:
      • example: Key = “Name” and Value = “Test Server”
  • Choose next to configure Security Group (or if you have already created a security group to allow SSH, then choose existing security group)
    • Keep the defaults for SSH connectivity (except change source by clicking the down arrow and choosing My IP, unless you want it open to the public then 0.0.0.0/0 will work just great)
  • Click Review and Launch
  • On the Review Instance Launch page, shown following, verify your settings and then choose Launch
  • Select an existing key pair or create a new key pair page
    • To Create a new key pair and set Key pair name to any name you would like: for example, “TestKey” or perhaps “EC2Key”. Be very sure to Choose Download Key Pair (you will be using this key for connectivity potentially for all of your AWS exercises) , and then save the key pair file on your local machine. You use this key pair file to connect to your EC2 instance.
  • To launch your EC2 instance, choose Launch Instances
  • Choose View Instances to find your instance.
  • Wait until Instance Status for your instance reads as Running

To Connect into your EC2 instance:
Goto Amazon’s EC2 connect guide as they have a great documentation on your choices of how to connect into an EC2 instance.


UPDATE YOUR EC2 INSTANCE

Once connected, run a linux update

sudo yum update -y

There ya go, launched and updated an AWS virtual server in just a few minutes


Next Steps

Perhaps you would like to Create a Web Server, if so ahead and go to the next module.


Caution: It is a good idea to remove an EC2 instance when you are finished with the instance, so as not to incur costs for leaving an EC2 running.

Creating a Static Website using Amazon AWS S3

Step 1: Create a bucket

Note: The instructions below uses the AWS console to create a bucket. It is an easy method for creating an S3 bucket.

To create a bucket, you must register with Amazon S3 and have a valid AWS Access Key ID to authenticate requests. By creating the bucket, you become the bucket owner.

Not every string is an acceptable bucket name. For information about bucket naming restrictions. See Bucket naming rules

You can create a bucket using other methods, like for instance using a Mac or Linux terminal command line interface, or Windows CMD or PowerShell command line interface.

  1. Sign in to the AWS Management Console and open the Amazon S3 console at https://console.aws.amazon.com/s3/
  2. Choose Create bucket
  3. Enter the Bucket name (for example, my-awesome-bucket)

*Note: S3 buckets must have a UNIQUE NAME. Literally it has to be a unique name within AWS S3 for ALL REGIONS, Globally

  1. Choose the Region where you want to create the bucket
  2. Accept the default settings and create the bucket, choose Create.

Step 2: Enable static website hosting

After you create a bucket, you can enable static website hosting for your bucket.

To enable static website hosting

  1. In the Buckets list, choose the bucket that you want to enable static website hosting
  2. Choose Properties
  3. Under Static website hosting, choose Edit
  4. Choose Use this bucket to host a website
  5. Under Static website hosting, choose Enable
  6. In Index document, enter the file name of the index document, typically index.html
  7. To provide your own custom error document for 4XX class errors, in Error document, enter the custom error document file name
  8. Choose Save changes

Amazon S3 enables static website hosting for your bucket. At the bottom of the page, under Static website hosting, you see the website endpoint for your bucket

Under Static website hosting, note the Endpoint

The Endpoint is the Amazon S3 website endpoint for your bucket. After you finish configuring your bucket as a static website, You can use this endpoint to test your website.

Step 3: Edit Block Public Access settings

By default, AWS blocks public access to your account and buckets.

If you want to use a bucket to host a static website, you can use these steps to edit your block public access settings.

Warning

Before you complete this step, review Blocking public access to your Amazon S3 storage to ensure that you understand and accept the risks involved with allowing public access. When you turn off block public access settings to make your bucket public, anyone on the internet can access your bucket. We recommend that you block all public access to your buckets.

  1. Open the Amazon S3 console at https://console.aws.amazon.com/s3/
  2. Choose the name of the bucket that you have configured as a static website
  3. Choose Permissions
  4. Under Block public access (bucket settings), choose Edit
  5. Clear Block all public access, and choose Save changes

Step 4: Add a bucket policy to make your bucket publicly available

After you edit S3 Block Public Access settings, you can add a bucket policy to grant public read access to your bucket. When you grant public read access, anyone on the internet can access your bucket.

  1. Under Buckets, choose the name of your bucket
  2. Choose Permissions
  3. Under Bucket Policy, choose Edit
  4. To grant public read access for your website, copy the following bucket policy, and paste it in the Bucket policy editor

{
    "Version": "2012-10-17",
    "Statement": [
        {
            "Sid": "PublicReadGetObject",
            "Effect": "Allow",
            "Principal": "*",
            "Action": [
                "s3:GetObject"
            ],
            "Resource": [
                "arn:aws:s3:::Bucket-Name/*"
            ]
        }
    ]
}

Update the code in the new policy with the name of YOUR BUCKET before saving.

In the preceding example, "Bucket-Name" is a placeholder. To use this bucket policy with your BUCKET, you must update the policy name to match your bucket’s name.

Choose Save changes.

Step 5: Configure an index document

When you enable static website hosting for your bucket, you enter the name of the index document (for example, index.html). After you enable static website hosting for the bucket, you upload an HTML file with this index document name to your bucket.

To configure the index document

  1. Create an index.html file. If you don’t have an index.html file, you can use the following HTML to create one:
    
    
        My Website Home Page
    
    
    <h1>Welcome to my website</h1>
    <p>Now hosted on Amazon S3!</p>
    
    
  1. Save the index file locally.

    The index document file name is case sensitive. For example, index.html and not Index.html.

Alternative Index method, I have provided a compressed zip file that contains a generic web site. You are free to download the file, Unzip the files locally and then upload the index.html along with the images and assets folder up to your S3 bucket.

  1. Sign in to the AWS Management Console and open the Amazon S3 console at https://console.aws.amazon.com/s3/
  2. In the Buckets list, choose your bucket
  3. To upload the index documentto your bucket, do one of the following:
    • Drag and drop the index file into the console bucket listing.
    • Choose Upload, and follow the prompts to choose and upload the index file (Or Perhaps) Upload your own static website files to your bucket or the generic web site files found below.

To configure an error document Create an error document, for example 404.html


        Something went wrong
    
    
    <h1>Sorry about that</h1>
    <p>Now hosted on Amazon S3!</p>


  1. Save the error document file locally

    Remember, The file name is case sensitive

  2. Sign in to the AWS Management Console and open the Amazon S3 console at https://console.aws.amazon.com/s3/

  3. To upload the error document to your bucket, do one of the following:

    • Drag and drop the error document file into the console bucket listing.
    • Choose Upload, and follow the prompts to choose and upload the index file. For step-by-step instructions, see Uploading objects.

Step 7: Test your website endpoint

After you configure static website hosting for your bucket, you can test your website endpoint.

Note: Amazon S3 does not support HTTPS access to the website. If you want to use HTTPS, you can use Amazon CloudFront to serve a static website hosted on Amazon S3.

  1. Under Buckets, choose the name of your bucket
  2. Choose Properties
  3. At the bottom of the page, under Static website hosting, choose your Bucket website endpoint
  4. Your new website opens in a separate browser window.

You now have a website hosted on Amazon S3. This website is available at the Amazon S3 website endpoint.

Step 8: Clean up

If you created your static website only as a learning exercise, delete the AWS resources that you allocated so that you do not accrue charges.


Files you can use to create a generic Web site

Note: The index.html file included below has a slight modification of a web site template provided by H5 up. I have provided the files to help make your exercise more interesting. However, I take no responsibility for the content and provided to you at your own risk! At the time of this writing, the files are free of virus and/or malware.

Launch an EC2 instance and Connect

This assumes you have left the default VPC in place or that you have created your own VPC with a public network. Also, be sure to select the region you want to create a EC2 instance before launching new EC2 instance.

Note: EC2 free tier accounts: only the t2.micro is free (and only if you use it for less than hours per month)

To launch an EC2 instance

  • Sign in to the AWS Management Console
    • Choose the region you wish to launch
  • Choose EC2 Dashboard, and then choose Launch instance
  • Choose the Amazon Linux 2 AMI
  • Chose the t2.micro instance type (free tier)
  • Click next to configure instance details
    • Network: Choose the VPC with a public subnet (either default VPC or one you’ve created)
    • Subnet: Choose an existing public subnet
    • Auto-assign Public IP: Choose Enable
  • Choose next to configure storage
    • Keep the defaults and add a tag of your choosing:
      • example: Key = “Name” and Value = “Test Server”
  • Choose next to configure Security Group (or if you have already created a security group to allow SSH, then choose existing security group)
    • Keep the defaults for SSH connectivity (except change source by clicking the down arrow and choosing My IP, unless you want it open to the public then 0.0.0.0/0 will work just great)
  • Click Review and Launch
  • On the Review Instance Launch page, shown following, verify your settings and then choose Launch
  • Select an existing key pair or create a new key pair page
    • To Create a new key pair and set Key pair name to any name you would like: for example, “TestKey” or perhaps “EC2Key”. Be very sure to Choose Download Key Pair (you will be using this key for connectivity potentially for all of your AWS exercises) , and then save the key pair file on your local machine. You use this key pair file to connect to your EC2 instance.
  • To launch your EC2 instance, choose Launch Instances
  • Choose View Instances to find your instance.
  • Wait until Instance Status for your instance reads as Running

To Connect into your EC2 instance:
Goto Amazon’s EC2 connect guide as they have a great explanation of your choices to connect into an EC2 instance.


UPDATE YOUR EC2 INSTANCE

Once connected, run a linux update

sudo yum update -y

There ya go, launched and updated an AWS virtual server in just a few minutes


Next Steps

Perhaps you would like to Create a Web Server, if so ahead and go to the next module.


Caution: It is a good idea to remove an EC2 instance when you are finished with the instance, so as not to incur costs for leaving an EC2 running.

It goes without saying, but it has to be said anyway. This is not for production!

All public websites should have some type of application firewall in between the Web Server and its internet connection!

As well it should be monitored and have event and incident management in place. The list of things that will make a better architecture for a web site continues! However, enough said at this time!

Creating an AWS Security Group

Create a Security Group for Public network

This exercise will create a security group that allows HTTP and HTTPS using the AWS Console to EC2 instances in a public network.

Note: This is for testing purposes only, normally we would place an application firewall in front of web servers, and possibly load balancers, and monitoring along with notification services, but hey, we are just creating a test (not production), right!!


Security group for an EC2 instance hosting a Website

  • Open the Amazon VPC console at https://console.aws.amazon.com/vpc/.
  • In the left side navigation pane, choose Security Groups.
  • Choose Create security group.
  • Enter a name for the security group (for example, Web Services), and then provide a description (allows http & https inbound).
  • From VPC, select the ID of your VPC.
  • (Optional) Add or remove a tag.[Add a tag] Choose Add new tag and do the following:
    • For Key, enter “Name”.
    • For Value, enter “Web Services”
  • Click ADD Rule
    • Under Type, click the down arrow and scroll to select “HTTP
      • Under Source, click the down arrow and choose “My IP
        Note: You can choose the default 0.0.0.0/0, if you want to leave the inbound connection OPEN to the World. I recommend using “My IP” address , which limits the inbound connection to only your network’s public IP address.
  • Click ADD Rule (again)
    • Under Type, click the down arrow and scroll to select “HTTPS
    • Under Source, click the down arrow and choose “My IP
  • Scroll down and click the button Create Security Group.

Create a Security group to allow SSH

This exercise will create a security group that allows SSH using the AWS Console

  • Open the Amazon VPC console at https://console.aws.amazon.com/vpc/.
  • In the left side navigation pane, choose Security Groups.
  • Choose Create security group.
  • Enter a name for the security group (for example, Web Services), and then provide a description (allows http & https inbound).
  • From VPC, select the ID of your VPC.
  • (Optional) Add or remove a tag.[Add a tag] Choose Add new tag and do the following:
    • For Key, enter “Name”.
    • For Value, enter “SSH”
  • Click ADD Rule
    • Under Type, click the down arrow and scroll to select “SSH
      • Under Source, click the down arrow and choose “My IP
        Note: You can choose the default 0.0.0.0/0, if you want to leave the inbound connection OPEN to the World. I recommend using “My IP” address , which limits the inbound connection to only your network’s public IP address.
  • Click the button Create security group

To create a security group using the command line

To describe one or more security groups using the command line

By default, new security groups start with only an outbound rule that allows all traffic to outbound and restrict all traffic inbound. You must add rules to enable any inbound traffic or to restrict the outbound traffic.

Adding, removing, and updating rules

When you add or remove a rule, any instances already assigned to the security group are subject to the change.

If you have a VPC peering connection, you can reference security groups from the peer VPC as the source or destination in your security group rules. For more information, see Updating your security groups to reference peer VPC security groups in the Amazon VPC Peering Guide.

To add a rule using the console

  1. Open the Amazon VPC console at https://console.aws.amazon.com/vpc/.
  2. In the navigation pane, choose Security Groups.
  3. Select the security group to update.
  4. Choose ActionsEdit inbound rules or ActionsEdit outbound rules.
  5. Choose Add rule. For Type, select the traffic type, and then specify the source (inbound rules) or destination (outbound rules). For example, for a public web server, choose HTTP or HTTPS and specify a value for Source as 0.0.0.0/0.If you use 0.0.0.0/0, you enable all IPv4 addresses to access your instance using HTTP or HTTPS. To restrict access, enter a specific IP address or range of addresses.
  6. You can also allow communication between all instances that are associated with this security group. Create an inbound rule with the following options:
    • TypeAll Traffic
    • Source: Enter the ID of the security group.
  7. Choose Save rules.

To delete a rule using the console

  1. Open the Amazon VPC console at https://console.aws.amazon.com/vpc/.
  2. In the navigation pane, choose Security Groups.
  3. Select the security group to update.
  4. Choose ActionsEdit inbound rules or ActionsEdit outbound rules.
  5. Choose Delete for the rule that you want to delete.
  6. Choose Save rules.

When you modify the protocol, port range, or source or destination of an existing security group rule using the console, the console deletes the existing rule and adds a new one for you.

To update a rule using the console

  1. Open the Amazon VPC console at https://console.aws.amazon.com/vpc/.
  2. In the navigation pane, choose Security Groups.
  3. Select the security group to update.
  4. Choose ActionsEdit inbound rules or ActionsEdit outbound rules.
  5. Modify the rule entry as required.
  6. Choose Save rules.

If you are updating the protocol, port range, or source or destination of an existing rule using the Amazon EC2 API or a command line tool, you cannot modify the rule. Instead, you must delete the existing rule and add a new rule. To update the rule description only, you can use the update-security-group-rule-descriptions-ingress and update-security-group-rule-descriptions-egress commands.

To add a rule to a security group using the command line

To delete a rule from a security group using the command line

To update the description for a security group rule using the command line

Changing an instance’s security groups

After you launch an instance into a VPC, you can change the security groups that are associated with the instance. You can change the security groups for an instance when the instance is in the running or stopped state.Note

This procedure changes the security groups that are associated with the primary network interface (eth0) of the instance. To change the security groups for other network interfaces, see Changing the security group.

To change the security groups for an instance using the console

  1. Open the Amazon EC2 console at https://console.aws.amazon.com/ec2/.
  2. In the navigation pane, choose Instances.
  3. Select the checkbox for the instance. The Security tab lists the security groups that are currently associated with the instance.
  4. To change the security groups that are associated with the instance, choose ActionsSecurityChange security groups.
  5. For Associated security groups, select a security group from the list, and then choose Add security group.To remove an already associated security group, choose Remove for that security group.
  6. Choose Save.

To change the security groups for an instance using the command line

Deleting a security group

You can delete a security group only if there are no instances assigned to it (either running or stopped). You can assign the instances to another security group before you delete the security group (see Changing an instance’s security groups). You can’t delete a default security group.

If you’re using the console, you can delete more than one security group at a time. If you’re using the command line or the API, you can only delete one security group at a time.

To delete a security group using the console

  1. Open the Amazon VPC console at https://console.aws.amazon.com/vpc/.
  2. In the navigation pane, choose Security Groups.
  3. Select one or more security groups and choose Security Group ActionsDelete Security Group.
  4. In the Delete Security Group dialog box, choose Yes, Delete.

To delete a security group using the command line

Deleting the 2009-07-15-default security group

Any VPC created using an API version older than 2011-01-01 has the 2009-07-15-default security group. This security group exists in addition to the regular default security group that comes with every VPC. You can’t attach an internet gateway to a VPC that has the 2009-07-15-default security group. Therefore, you must delete this security group before you can attach an internet gateway to the VPC.Note

If you assigned this security group to any instances, you must assign these instances a different security group before you can delete the security group.

To delete the 2009-07-15-default security group

  1. Ensure that this security group is not assigned to any instances.
    1. Open the Amazon EC2 console at https://console.aws.amazon.com/ec2/.
    2. In the navigation pane, choose Network Interfaces.
    3. Select the network interface for the instance from the list, and choose Change Security GroupsActions.
    4. In the Change Security Groups dialog box, select a new security group from the list, and choose Save.When changing an instance’s security group, you can select multiple groups from the list. The security groups that you select replace the current security groups for the instance.
    5. Repeat the preceding steps for each instance.
  2. Open the Amazon VPC console at https://console.aws.amazon.com/vpc/.
  3. In the navigation pane, choose Security Groups.
  4. Choose the 2009-07-15-default security group, and then choose Security Group ActionsDelete Security Group.
  5. In the Delete Security Group dialog box, choose Yes, Delete.

Creating a VPC manually

Two public and two private subnets

Step One – Create VPC

  1. Sign into AWS Console https://console.aws.amazon.com/vpc/
  2. Select your choice of an AWS region
    • ie. I’m from Los Angeles and choose Northern California as my region of choice
  3. Click on VPCs (under Resources by Region)
  4. In VPC settings, type in the following:
    • Name Tag = “New-VPC”
    • IPv4 CIDR block = “10.0.0.0/16”
    • Keep the defaults for the rest of the VPC form
    • Click Create VPC
    • After the New-VPC is created click on the New-VPC ID to see the details of the VPC
    • Notice that by default the DNS hostnames is disabled. It is not necessary, however, many tutorials will mention using the DNS hostnames, so it might be a good idea to change the DNS hostnames to “enabled”

Step One – Creating the Subnets

Step 1a – Public Subnet A

  1. On the left Navigation Pane – find and choose Subnets
  2. Select Create subnet
  3. Under VPC – click “Select a VPC” and choose the new subnet created called “New-VPC
  4. Under Subnet settings
    • Type in a subnet name, ie. “New-Public-Subnet-A
    • Type in a CIDR block for the IP range you would like to create for this subnet:
      • i.e. 10.0.1.0/25
  5. Under Availability Zone
    • Note: In region US-WEST-1 there exists only two availability zones, us-west-1a and us-west-1c
    • Choose us-west-1a
  6. Keep the defaults for the rest of the Subnet Form
  7. Click Create Subnet

Step 1b – Public Subnet B

  1. On the left Navigation Pane – find and choose Subnets
  2. Select Create subnet
  3. Under VPC – click “Select a VPC” and choose the new subnet created called “New-VPC
  4. Under Subnet settings
    • Type in a subnet name, ie. “New-Public-Subnet-B
    • Type in a CIDR block for the IP range you would like to create for this subnet:
      • i.e. 10.0.2.1/25
  5. Under Availability Zone
    • Note: Now we will choose an availability zone other than the one selected for Public-Subnet-A
    • Choose us-west-1c
  6. Keep the defaults for the rest of the Subnet Form
  7. Click Create Subnet

Step 1c – Private Subnet A

  1. On the left Navigation Pane – find and choose Subnets
  2. Select Create subnet
  3. Under VPC – click “Select a VPC” and choose the new subnet created called “New-VPC
  4. Under Subnet settings
    • Type in a subnet name, ie. “New-Private-Subnet-A
    • Type in a CIDR block for the IP range you would like to create for this subnet:
      • i.e. 10.0.2.0/25
  5. Under Availability Zone
    • Note: In region US-WEST-1 there exists only two availability zones, us-west-1a and us-west-1c
    • Choose us-west-1a
  6. Keep the defaults for the rest of the Subnet Form
  7. Click Create Subnet

Step 1d – Private Subnet B

  1. On the left Navigation Pane – find and choose Subnets
  2. Select Create subnet
  3. Under VPC – click “Select a VPC” and choose the new subnet created called “New-VPC
  4. Under Subnet settings
    • Type in a subnet name, ie. “New-Private-Subnet-B
    • Type in a CIDR block for the IP range you would like to create for this subnet:
      • i.e. 10.0.2.128/25 (128 IP addresses available for this subnet)
  5. Under Availability Zone
    • Note: Now we will choose an availability zone other than the one selected for Private-Subnet-A
    • Choose us-west-1c
  6. Keep the defaults for the rest of the Subnet Form
  7. Click Create Subnet

Check it out – We have a new VPC with four subnets

Hurray!! We now have a New-VPC and four subnets. BUT, let’s take a closer look at our subnet communications, because we are not done yet, as we now need to lay out the communication rules for our subnets.

Select the ID of any of the subnets, and the AWS console will show all the details for the selected subnet. Notice, a routing table and a network ACL table was automatically created for the new subnet. The routing table, allows routes to all other subnets with the route table of 10.0.0.0/16, and the network ACL has an automatic deny all for inbound and outbound traffic. So now we have subnets that can talk to each other but can not talk to the rest of the world. Guess we aren’t done yet.

The next steps are equally as important. We need a gateway to the internet to allow inbound/outbound traffic for our public networks. Another gateway to the internet that allows outbound traffic for our private networks.

As well, we need routing and firewall rules. So, we have to install an Internet gateway, a NAT gateway (or NAT instances), update the routing tables to/from the gateways, and create security groups to allow inbound traffic such as SSH, HTTP & HTTPS.

Step Two – Setup an Internet Gateway

  • If you don’t have it open already, goto the AWS VPC console
  • In the left hand navigation pane, select Internet Gateways
  • Then click Create Internet Gateway
  • Under Name Tag, give it a name, ie. New-Internet-Gateway
  • Keep the default settings for the rest of the form
  • Click Create Internet Gateway
  • The console will show the gateways has been created, and will show the ID of the gateway
  • In the upper right hand corner, click Attach to a VPC
  • In the VPC box, under available VPCs, click on Select a VPC and your New-VPC will automatically be displayed. Click on your New-VPC to select it
  • Then click Attach internet gateway

Step Three – Update the Internet routing

  • If you don’t have it open already, goto the AWS VPC console and select VPCs, then select your “New-VPC”, by clicking on the VPC ID of “New-VPC”
  • Then click the route table ID shown under the Main route table (this will select the route table for your new vpc)
  • You should now see the details of a route table for your new VPC. Click the Edit Routes tab
  • Click Add route
  • Under Destination, type 0.0.0.0/0
  • Under Target, click the down arrow and your new Internet Gateway should automatically be displayed. Select your new internet gateway
  • Click Save routes
  • Close the screen that pops up
  • Now find and click on the Subnet Associations Tab
    • Notice: The table states that you have no subnet associations and therefore:
      • The following subnets have not been explicitly associated with any route tables and are therefore associated with the main route table:
  • So we need to make sure we associate the public subnets with this route table (not the private subnets, we’ll fix them in just a bit)
  • Click on Edit Subnet Associations button
  • Select New-Public-Subnet-A and New-Public-Subnet-B
  • Then click Save

Step Four – Create a NAT Gateway

CAUTION: So far everything in the first three steps, do not incur any charges. However, for some strange reason A NAT Gateway (unlike the Internet Gateway) IS NOT FREE! YOU WILL BE CHARGED THE MOMENT YOU CREATE A NAT GATEWAY. So don’t leave the NAT Gateway running for very long, unless you are willing to pay about $1.00 or more per day. If you leave it running for an hour, it will cost you about a nickel per hour in the US regions.

An alternative is to use a NAT instance (an EC2 Instance specially configured as a NAT). AWS Free Tier allows 750 hours of a t2.micro EC2 running hours per month and hence a NAT instance is a good choice to use in a Free Tier Account. The creation of a NAT Instance will be covered as an alternative below. That said, a NAT Gateway is a managed service by AWS that is scalable and more efficient with routing traffic to the internet and in my opinion is worth a few cents to leave it running for a few hours.

  • Goto the AWS VPC console
  • In the left hand navigation pane select NAT Gateways
  • Click Create NAT Gateway
  • In the NAT gateway settings under Name type New-NAT-Gateway
  • Under Subnet, click Select a subnet, and select New-Public-Subnet-A
  • Alongside of the Elastic IP allocation ID is a button Allocate Elastic IP, click on that button and it will automatically allocate an Elastic IP ID
    • Caution: if you delete a NAT Gateway, its Elastic IP Address might still exist but not be associated.
    • AWS does NOT charge for an Elastic IP address that is allocated and associated, therefore during the lifetime of your NAT gateway, there is no extra charge for an Elastic IP address
      • But, AWS DOES CHARGE for an Elastic IP address that IS NOT associated. If you delete the NAT gateway, make sure you don’t have an Elastic IP address just hanging out by itself with no association (it will cost you money).
  • Click Create NAT gateway
  • Ideally in a production VPC cloud design, we would repeat the creation of a NAT gateway into the other public subnet (New-Public-Subnet-B). However, for the purposes of this tutorial, and the fact that most of us will be testing with a Free Tier AWS account, a single NAT gateway will suffice.
    • A second NAT gateway in another availability zone gives resiliency to our architecture, in case any events occur in an opposing availability zone that forces a service outage for resources within the availability zone, the second NAT gateway will still be working.

Step Five – Create a route table for Private Subnets via our new NAT gateway

  • Goto the AWS VPC console
  • In the left hand navigation pane select Route Tables
  • Click Create Route Table button
  • Type Private Route Table for Name Tag
  • For VPC, click the down arrow and Select our New-VPC
  • Click Create
  • Click on the route table ID in the screen that pops up
  • Click the Routes tab
  • Click Edit Routes
  • Click Add route
  • Type 0.0.0.0/0 for the Destination
  • Under Target click the down arrow and select our New-NAT-Gateway
  • Click Save Routes
  • Close the screen that pops up
  • Click the Subnet Associations tab
  • Click the Edit Subnet Associations button
  • Click Private-Subnet-A and Private-Subnet-B
  • Then click Save

A Working VPC with two public and two private subnets is now operational

Optional – Testing the new VPC with a bastion host

  • See the page Create Security group and setup “allow SSH
  • See the page Create an EC2 instance and setup an EC2 instance in either one of the public subnets with a public IP address and assign the Allow SSH security group created in the first step, assign the new EC2 instance a tag Key=”Name”, Value=”Bastion Host“.
    • Note: bastion host is a server whose purpose is to provide access to a private network from an external network, such as the Internet.
  • Jot down the Private IP address of the new EC2 instance (the private IP address will be used in the next step)
  • Create another new Security group that allows SSH only from the private IP address of the new EC2 instance created above), bastion host and name it “SSH-Bastion”
  • Create another EC2 Instance in a private subnet, without a public IP Address.
    • Any server installed into a Private Subnet, should not have a public IP address. Without a private IP address we are eliminating the ability to connect to an EC2 instance from the internet (hence why it is called “private”)
    • We need another avenue to connect to a private server, which is why we created the bastion host. We’ll connect to a bastion host, and then SSH from the Bastion host to a private server
  • Ideally by now, you have created an AWS Key Pair for example “testkey.pem” and you have already copied the key pair to an appropriate folder. This instruction assumes that you have the key located in the hidden folder /.ssh.
    • At the command line, type in:
ssh-add ~/.ssh/testkey.pem
  • Note: the above line assumes the location of your private key, change the path to your private key above, if your private key is located somewhere besides the /.ssh folder
    • ssh-add is a command for adding SSH private keys into the SSH authentication agent for implementing single sign-on with SSH. The agent process is called ssh-agent
    • Note: this allows us to connect to bastion host, and then from the bastion host connect to a private server (without having to copy our private keys to the bastion host)
  • Now we connect to the Bastion host using the following command
ssh -A ip-address

Where “ip-address” is the public ip-address of the bastion host

  • And now we connect to a private server, once connected to the bastion host

CleanUP

Once finished with this exercise, be sure to delete the following. You do not want to leave the resources running from this tutorial or it will consume your allocation of Free Tier Hours and especially the NAT Gateway as it is not free within a Free Tier account

Note: If you did use a NAT gateway, it will only cost you less than a dollar (today’s pricing in the us-west region) to run a NAT gateway for a few hours

  • Terminate the EC2 instances
  • Delete the new Security Groups
    • Note: Its Ok to leave security Groups in place, Security groups are Free in AWS
  • Delete the NAT Gateway (especially remember to delete the Nat gateway, it is not Free)
  • Release all Elastic IP addresses addresses
  • Delete the VPC
    • Note: Its Ok to leave a VPC with subnets in place
    • A VPC and its subnets are Free on any AWS account
Exit mobile version
%%footer%%