Modular coding enables the use of “independent” code. Instead of creating a monolithic structure of code.
The advent of Service Oriented Architecture focused on creating independent and discrete services instead of a monolithic design. Architects and lead engineers began to see the benefit of writing code in such a fashion as to allow teams to write code independently. Then use program interfaces to pass data, or queries, or instructions between the services. Writing modular code is the same idea of writing independent services but instead, we are writing independent modules. The idea is simple, break code into sizeable and manageable blocks of code. Each block of code becomes a file and the files within a folder become a module. We then piece together different modules to achieve infrastructure that supports the deployment of IT resources.
When writing Infrastructure as code, we are code to deploy resources in AWS, GCP, Azure, and other cloud providers. We can either write a long block of code that deploys a VPC, Security Groups, file storage, load balancers, front-end application servers, back-end databases, email interfaces, monitoring, application firewalls, and the list goes on. This becomes one massive file if we write everything into one file. The problem with large monolithic code is when you have hundreds of lines of code that fail, then when you troubleshoot, you’ll have hundreds or even thousands of lines of code to figure out the root cause. Troubleshooting a failure amongst hundreds of lines of code takes time, and possibly becomes a tediously daunting task. Equally, when it comes to testing the code, a huge monolithic code structure causes a requirement to create a large test plan that must test every function, and the test itself can become time-consuming.
Modular code is all about writing code into smaller files. We then publish the functional bits of code so that it is reusable in other deployments.
Consider a Bastion host (I call it a “Controller” as I use a Bastion host to run Ansible code sometimes). I have a module that sits in a separate directory. I deploy my controller only when I need it. My module for deploying a controller has no relationship or purpose when I’m writing other code deployments. Therefore, it is not usually required as part of my cloud development. Instead, it is a block of code that I have written to support me when I need to reach into my cloud environment for troubleshooting or inspecting resources using SSH via my bastion host. It’s a perfect example of a module (a block of code that is independent and deployable by itself).
Hashicorp’s Terraform has a registry of Terraform modules written and supported by a community of developers. It is a perfect example of modular code being published for use as independent modular code ready for you to include in your library of modules. I highly recommend perusing the registry of modules.
The Secret ingredient to modular terraform (Outputs, Inputs)
Output/Input -The secret to modular and reusable Terraform code is wrapping our heads around the idea of creating code into a folder that becomes a module and instructing the code to output parameters; as inputs to other code. Hence, we are passing data between modules. For example, code to create a VPC will include an output of the “VPC ID,” Other modules will know the “VPC ID” by essentially getting the ID from Terraforms “Output.”
Location, Location, Location – The other secret is to put Terraform Outputs in a shared area for additional modules to use “the outputs”, as input “data.” for example, putting Terraform Outputs in Terraform’s remote state within an S3 bucket.
Dry code (the principle of “do not repeat yourself“) means creating lines of code once and using or referencing that code many times. The benefit to everyone is re-usable code.
The benefit
reduces mistakes
creates reusable code
creates code that can be shared
Writing code once, instead of repeating the writing of code
Someone writes a bit of code and puts the code in a shared location
This allows other team members to copy the code or make references to the code
Everyone uses the same code but varies the utilization of code with variables
It makes sense to test and validate code in a test environment, then deploy the same code in production using variables that change the parameters of deployment.
We can accomplish dry code in Terraform by placing the “Infrastructure as Code” in a shared location such as Git, GitHub, AWS S3 buckets, shared files on your network, or a folder structure on your workstation. Then using the shared code in different deployments simply by using environment variables.
Example
Write code that creates a VPC in AWS using variables, like a variable for the VPC name and another variable for the VPC IP address block.
Then place that VPC code in a shared folder.
Team A needs a VPC for testing a new load-balanced application. Team A uses VPC code in a shared folder and assigns attributes to the variables to make the deployment unique to the test environment.
Team B needs to deploy a CRM into production and requires a new VPC. Team B uses the very same VPC code from the shared folder and assigns attributes to the variables to make the deployment unique to the production environment.
Both teams used the same code to build a VPC, one for a test environment and the other for a production environment. Neither team had to write code to create a VPC. Both used a shared code to create a VPC and assign values to the variables to meet their requirements.
Four EC2 Web Servers behind a Classic load balancer
Ability to launch or destroy bastion host (jump server) only when needed
Can add/remove bastion host (jump server) at any time without impact to other resources (Bastion Hosts – Provides administrators SSH access to servers located in a private network)
In the previous exercise, we created a web server that was configured with a static website. We will use that configuration (AMI ID), for this exercise. Use the previous exercise EC2 image, saved as an EC2 image (We will need the AMI ID of that image for this exercise).
Infrastructure
New Infrastructure
Dry Code (reusable and repeatable)
Dry code (the principle of “do not repeat yourself”) means creating lines of code once and using or referencing that code many times. The benefit to everyone is re-usable code.
Someone writes a bit of code and puts the code in a shared location
This allows other team members to copy the code or make references to the code
Everyone uses the same code but varies the utilization of code with variables
In the case of AWS deployments with Terraform, referenced code applied to a test environment using variables will create smaller or fewer resources in a test environment. In contrast, the same code with variables would deploy a larger resource or a greater scale of resources in production.
It makes sense to test and validate code in a test environment, then deploy the same code in production using variables that change the parameters of deployment.
We can accomplish dry code in Terraform by placing the “Infrastructure as Code” in a shared location such as Git, GitHub, AWS S3 buckets, shared files on your network, or a folder structure on your workstation. Then using the shared code in different deployments simply by using environment variables.
independent and modular
Modular coding allows code to be deployed “independent” of other code. For example, the ability to launch and test security groups, load balancers, EC2 instances, or containers as deployment modules, with or without dependencies on other resources.
Consider a bastion host (I call it a “Controller” as I also use a bastion host to run Ansible code). Using modular code we can launch a jump server (bastion-host) using Terraform, do some administration using SSH into some private servers, and when finished, we can shut down the controller. Meanwhile, Infrastructure launched with other modular code remains operational and not impacted by our addition and subsequent removal of a bastion host.
The Secret ingredient to modular terraform (Outputs, Inputs)
Output/Input -Seriously, the secret to modular and reusable Terraform code is wrapping our heads around putting code into a folder and using code to output certain parameters from that code into a remote state. Then using the outputted parameters from the remote state; as parameter inputs. Hence, we are passing data between modules. For example, code to create a VPC will include an output of the “VPC – ID”, and other modules will know the VPC ID by essentially getting the ID from Terraforms “Output.”
Location, Location, Location – The other secret is to place the output in a location for other modules to use as input “data.”, for example placing a remote state into an S3 bucket.
Using AWS S3 bucket
The diagram above represents storing Terraform state in an AWS S3 bucket. Create a Terraform Output parameter, which is placed into Terraform’s state file. Another module then gets the data.
Say for example we create a VPC and use an output statement as follows;
So one module outputs the property value of an AWS resource using an Output statement with a name, in this case, “vpc_id”, another module gets the data of the AWS resource by getting the data from Terraform State referencing the Output name, in this case, “vpc_id”.
So let us get started
First, please create the following folder structure shown below.
After creating the folders, we will place code into each folder and then use “Terraform apply” a few times to demonstrate the independence of modular Terraform code.
I like the community-built module AWS VPC Terraform module because it can create a VPC with public and private subnets, an internet gateway, and a Nat gateway with just a few lines of code.
However, to my knowledge, it is not written or supported by Hashicorp. It is written and supported by antonbabenko. I’m sure it’s a great module, and I personally use it, but I don’t know enough about it to recommend it for production usage. I have done some rudimentary tests, it works great, makes it far easier to produce the VPC & subnets in my test account. But, treat this module like any other community or open-source code before using it in production and do your own research.
vpc.tf
terraform {
required_providers {
aws = {
source = "hashicorp/aws"
}
}
}
terraform {
backend "s3" {
bucket = "randomName-terraform-states"
key = "terraform.tfstate"
region = "us-west-1" # Change to the region you selected for your S3 bucket
}
}
provider "aws" {
region = var.aws_region
}
data "aws_availability_zones" "available" {
state = "available"
}
data "aws_region" "current" { }
module "vpc" {
source = "terraform-aws-modules/vpc/aws"
version = "3.6.0"
cidr = var.vpc_cidr_block
azs = data.aws_availability_zones.available.names
private_subnets = slice(var.private_subnet_cidr_blocks, 0, 2)
public_subnets = slice(var.public_subnet_cidr_blocks, 0, 2)
# database_subnets= slice(var.database_subnet_cidr_blocks, 0, 2)
enable_dns_support = true
enable_nat_gateway = true
#enable_vpn_gateway = false
single_nat_gateway = true
tags = {
Name = "${var.environment}-VPC"
Stage = "${var.environment}"
Owner = "${var.your_name}"
}
}
Note: This will create a NAT gateway that is not free in AWS Free Tier; there will be a cost! For example: about a dollar per day in the US-West -1 region if left running.
Create variables.tf (in the VPC folder)
variable "aws_region" {
description = "AWS region"
type = string
}
variable "environment" {
description = "User selects environment"
type = string
}
variable "your_name" {
description = "Your Name?"
type = string
}
variable "ssh_location" {
type = string
description = "My Public IP Address"
}
variable "vpc_cidr_block" {
description = "CIDR block for VPC"
type = string
default = "10.0.0.0/16"
}
variable "public_subnet_cidr_blocks" {
description = "Available cidr blocks for public subnets"
type = list(string)
default = [
"10.0.1.0/24",
"10.0.2.0/24",
"10.0.3.0/24",
"10.0.4.0/24",
"10.0.5.0/24",
"10.0.6.0/24",
"10.0.7.0/24",
"10.0.8.0/24"
]
}
variable "private_subnet_cidr_blocks" {
description = "Available cidr blocks for private subnets"
type = list(string)
default = [
"10.0.101.0/24",
"10.0.102.0/24",
"10.0.103.0/24",
"10.0.104.0/24",
"10.0.105.0/24",
"10.0.106.0/24",
"10.0.107.0/24",
"10.0.108.0/24"
]
}
variable "database_subnet_cidr_blocks" {
description = "Available cidr blocks for database subnets"
type = list(string)
default = [
"100.201.0/24",
"100.202.0/24",
"100.203.0/24",
"100.204.0/24",
"100.205.0/24",
"100.206.0/24",
"100.207.0/24",
"100.208.0/24"
]
}
variable "public_subnet_count" {
description = "Number of public subnets"
type = number
default = 2
}
variable "private_subnet_count" {
description = "Number of private subnets"
type = number
default = 2
}
variable "database_subnet_count" {
description = "Number of database subnets"
type = number
default = 2
}
Note: No “default” settings for the following variables.
Region
Environment
Your_Name
ssh_location
When creating variables without a “default”, it will cause “terraform apply,” to ask for your input for each of the variables that do not have a default setting. This allows an admin to stipulate a region of choice upon execution. Giving a Tag and optional input allows us to tag a deployment as “Test” or Development”. Using a variable with no default for “My public IP address” I named in this exercise as SSH_Location, allows you to input your public IP address and not have the IP address embedded in code. Hence, we can deploy the same code into different regions and environments, simply by changing the input to variables.
Instead of inputting answers manually for the above variables every time the code is executed, a common practice would be to create an “answer file using “.tfvars”. For example, we can create a “test.tfvars” file and then use that answer file as part of the Terraform Apply command, where the command would be: “Terraform apply -var-file=test.tfvars” And the file would look something like the following:
Note: A benefit of putting your answers into a file like “test.tfvars”, is that you can protect your answers from the public. By adding “*.tfvars” into .gitignore. A .gitignore file will force git to ignore stated file patterns in the .gitignore when pushing files into Github, which assures your sensitive dat is not copied into Git or GitHub.
Create security_groups.tf (in vpc folder)
Create a security group for the controller in the same folder “VPC”.
“Output.tf” will be used as data for other modules to use as “Input” data In example : (elb-tf folder).
Outputs
Outputs.tf
# ------ Output Region ------------------------------
output "aws_region" {
description = "AWS region"
value = data.aws_region.current.name
}
# ------- Output VPC ID ------------------------------
output "vpc_id" {
  description = "Output VPC ID"
  value       = module.vpc.vpc_id
}
# ------- Output Controller Security Group ID --------
output "Controller-sg_id" {
description = "Security group IDs for Controller"
value = [aws_security_group.controller-ssh.id]
}
# ---- Output Load Balancer Security Group ID --------
output "lb_security_group_id" {
description = "Security group IDs for load balancer"
value = [aws_security_group.lb-sg.id]
}
# ------- Output Web Servers Security Group ID --------
output "elb_web-sg_id" {
description = "Security group IDs for elb-Web servers"
value = [aws_security_group.elb_web_sg.id]
}
# ------- Output Public Subnet Group IDs -------------
output "public_subnet_ids" {
description = "Public subnet IDs"
value = module.vpc.public_subnets
}
# ------- Output Private Subnet Group IDs ------------
output "private_subnet_ids" {
description = "Private subnet IDs"
value = module.vpc.private_subnets
}
As shown above, the “outputs.tf” is providing output data for: Region, vpc_id, controller-sg_id, public_subnet_ids, private_subnet_ids.
After applying “Terraform apply -var-file=tfvars”, you will see the above outputs displayed in the terminal console.
New Module and New Folder Load Balancer and distributed Web Servers
We are going to provision the Elastic Load Balancer and Web Servers from a different folder. A separate folder automatically becomes a module to Terraform. This module is isolated, and we can provision using this module from another workstation or even using a different privileged IAM user within an AWS account.
Create a new folder “elb-web” cd into the directory and let’s get started.
elb-web.tf
terraform {
  required_providers {
    aws = {
      source = "hashicorp/aws"
    }
  }
}

# ------------- Configure the S3 backend for Terraform State -----------
data "terraform_remote_state" "vpc" {
  backend = "s3"
  config = {
    bucket = "randomName-terraform-states"
    key    = "terraform.tfstate"
    region = "us-west-1"
  }
}

# ------------ Pull the remote state data to determine region ----------
provider "aws" {

  region = data.terraform_remote_state.vpc.outputs.aws_region
}
So we begin making statements, AWS is the cloud platform, and Hashicorp AWS is the module provider. Then stipulate an S3 bucket as the remote state and acquire our first “data input, from the S3 bucket, ” which is “data.terraform_remote_state.vpc.outputs.” and acquire the “Name” another input from the remote state, “aws_region”.
Inputs
elb-web.tf – continued
module "elb_http" {
  source  = "terraform-aws-modules/elb/aws"
  version = "3.0.0"

  # Ensure load balancer name is unique
  name = "lb-${random_string.lb_id.result}-${var.environment}-lb"

  internal = false

  security_groups = data.terraform_remote_state.vpc.outputs.lb_security_group_id
  subnets         = data.terraform_remote_state.vpc.outputs.public_subnet_ids # pulling remote state data to obtain the public subnet IDS

  number_of_instances = length(aws_instance.app)
  instances           = aws_instance.app.*.id

  listener = [{
    instance_port     = "80"
    instance_protocol = "HTTP"
    lb_port           = "80"
    lb_protocol       = "HTTP"
  }]

  health_check = {
    target              = "HTTP:80/index.html"
    interval            = 10
    healthy_threshold   = 3
    unhealthy_threshold = 10
    timeout             = 5
  }
}
resource "aws_instance" "web" {
  ami = "ami-08f38617285ff6cbd" # this is my AMI ID from previous exercise - an EC2 instance configured with a static website and saved as an EC2 image
  count = var.instances_per_subnet * length(data.terraform_remote_state.vpc.outputs.private_subnet_ids)
  instance_type = var.instance_type
  key_name               = var.key
  # get the subnet IDs from remote state S3 buckets
  subnet_id              = data.terraform_remote_state.vpc.outputs.public_subnet_ids[count.index % length(data.terraform_remote_state.vpc.outputs.private_subnet_ids)]
  vpc_security_group_ids = data.terraform_remote_state.vpc.outputs.elb_web-sg_id # Will create the security groups a bit later in this exercise
  tags = {
    Name          = "${var.environment}-Static_Web_Server"
    Stage         = "${var.environment}"
    Owner         = "${var.your_name}"
  }
}
“Count” is a resource configuration that tells Terraform how many EC2 instances to create, and the length tells how many subnets to place the count of instances. In this case, we have two private subnets, so the “count” configuration will place two instances of the EC2 AMI into the two private subnets.
Note: once again, we are using “remote state” to obtain the private subnet information from the VPC module by using outputs placed into Terraform remote state S3 bucket by using “data_remote_state” to get the data for private subnets. .
variables.tf (for elb-web folder)
variable "instances_per_subnet" {
  description = "Number of EC2 instances in each private subnet"
  type        = number
  default     = 2
}

variable "instance_type" {
  description = "Type of EC2 instance to use"
  type        = string
  default     = "t2.micro"
}

variable "environment" {
  description = "User selects environment"
  type = string
  default = "Test"
}

variable "key" {
  type    = string
}

variable "your_name" {
  description = "Your Name?"
  type        = string
}

variable "ssh_location" {
  type        = string
  description = "My Public IP Address"
}

variable "controller_sg" {
  type = string
}

variable "lb_sg" {
  type = string
}
Create and cd into a directory named “controller”. We will create three files: controller.tf, s3_policy.tf, and variables.tf
controller.tf
Note: We do not have to create or launch the controller for the load-balanced website to work. The controller (jump server) is handy if you want to SSH into one of the private servers for maintenance or troubleshooting. You don’t really need it, until you need it. hehe!
terraform {
  required_providers {
    aws = {
      source = "hashicorp/aws"
    }
  }
}

#------------------------- State terraform backend location---------------------
data "terraform_remote_state" "vpc" {
  backend = "s3"
  config = {
    bucket = "Your bucket name"  # be sure to update with name of your bucket
    key    = "terraform.tfstate"
    region = "us-west-1"
  }
}

# --------------------- Determine region from backend data -------------------
provider "aws" {
  region = data.terraform_remote_state.vpc.outputs.aws_region
}

#--------- Get Ubuntu 20.04 AMI image (SSM Parameter data) -------------------
data "aws_ssm_parameter" "ubuntu-focal" {
  name = "/aws/service/canonical/ubuntu/server/20.04/stable/current/amd64/hvm/ebs-gp2/ami-id"
}


# Creating controller node
resource "aws_instance" "controller" {
  ami                    = data.aws_ssm_parameter.ubuntu-focal.value # from SSM Paramater
  instance_type          = var.instance_type
  subnet_id              = data.terraform_remote_state.vpc.outputs.public_subnet_ids [0]
  vpc_security_group_ids = data.terraform_remote_state.vpc.outputs.Controller-sg_id
  iam_instance_profile   = "${aws_iam_instance_profile.assume_role_profile.name}"
  user_data              = file("bootstrap_controller.sh")
  private_ip             = "10.0.1.10"
  monitoring             = true
  key_name               = var.key

    tags = {
    Name          = "${var.environment}-Controller"
    Stage         = "${var.environment}"
    Owner         = "${var.your_name}"
  }
}

output "Controller" {
  value = [aws_instance.controller.public_ip]
}
s3_policy.tf
The S3 policy is not required for a Jump Server. We might need some files for common maintenance of server configuration using Ansible. I like to place these files into an S3 bucket such that Ansible playbooks can be applied to multiple servers. An S3 policy allows our Jump server (controller) access to an S3 bucket
# ------------ Create the actual S3 read & copy files policy ----
resource "aws_iam_policy" "copy-policy" {
  name        = "S3_Copy_policy"
  description = "IAM policy to allow copy files from S3 bucket"

  policy = <<EOF
{
  "Version": "2012-10-17",
  "Statement": [
    {
      "Effect": "Allow",
      "Action": ["s3:PutObject",
                "s3:GetObject",
                "s3:ListBucket"
            ],
      "Resource": ["arn:aws:s3:::S3-bucket-for-Ansible-Files",
                    "arn:aws:s3:::S3-bucket-for-Ansible-Files/*"]
    }
  ]
}
EOF
}

# ------------------ create assume role -----------------
resource "aws_iam_role" "assume-role" {
  name               = "assume-role"
  description        = "IAM policy that allows assume role"
  assume_role_policy = <<EOF
{
    "Version": "2012-10-17",
    "Statement": [
      {
        "Action": "sts:AssumeRole",
        "Principal": {"Service": "ec2.amazonaws.com"},
        "Effect": "Allow",
        "Sid": ""
      }
    ]
}
EOF
}
# ------------ attach the role to the policy ----------------
resource "aws_iam_role_policy_attachment" "assign-copy-policy" {
  role       = aws_iam_role.assume-role.name
  policy_arn = aws_iam_policy.copy-policy.arn
  depends_on = [aws_iam_policy.copy-policy]
}

# ------------ create a profile to be used by EC2 instance ----
resource "aws_iam_instance_profile" "assume_role_profile" {
  name = "assume_role_profile"
  role = aws_iam_role.assume-role.name
}
variables.tf
variable "key" {
  type    = string
  default = "EC2 key pair name"  #be sure to update with the name of your EC2 Key pair for your region
}
variable "instance_type" {
  description = "Type of EC2 instance to use"
  type        = string
  default     = "t2.micro"
}
variable "environment" {
  description = "User selects environment"
  type = string
  default = "Test"
}
variable "your_name" {
  description = "Your Name?"
  type = string
  default = "Your Name"
}
Provisioning
Be sure to change the S3 Bucket name in S3_policy.tf (lines 16 & 17), shown above in Red, into your S3 bucket name
Be sure to change the test.tfvars in the VPC folder, variables of your choice
Be sure to change the test.tfvars in the ELB-WEB folder, to variables of your choice
Be sure to change the main.tf lines 11-13 with the configuration for your S3 bucket to store terraform backend state
In your terminal, go to the VPC folder and execute the following commands:
Terraform init
terraform validate
Terraform apply -var-file=test.tfvars
In your terminal, go to the elb-web folder and execute the following commands:
Terraform init
terraform validate
Terraform apply -var-file=test.tfvars
That is it, we have launched and should now have a load-balanced static website with resilience across availability zones and within each zone have at least two web servers for high availability
The controller (bastion host), can be launched at any time. Quite often, I’ll launch the controller to troubleshoot a test deployment.
It goes without saying, but it has to be said anyway. This is not for production!
All public websites should have some type of application firewall in between the Web Server and its internet connection!
All websites should have monitoring and a method to scrape log events to detect potential problems with the deployment.
It is a good idea to remove an EC2 instance, or and ELB, when you are finished with the exercise, so as not to incur costs
Note: the above instructions are links to AWS documentation. I’m planning on writing up the use of Packer for Docker and Vagrant for virtual machines, along with Ansible configurations, as future posts.
Note: You don't have to install the requirements on your desktop. You can use a virtual desktop for your development environment using tools like Oracle's virtualbox or VMware Workstation or Player, or Mac Fusion or Mac Parallels. Perhaps an AWS Workspace or AWS Cloud 9 environment.
This example creates a static web server and a controller (otherwise called a bastion host or even a jump server). I like to call it a controller because, in later exercises, I will use the controller to execute an Ansible configuration of public and private AWS EC2 servers. For now, though, this exercise keeps it simple and creates a jump server (bastion host):
It demonstrates restricting SSH & HTTP traffic.
In the case of the web server, it allows SSH only from the controller (jump server)
In the case of the web server, it allows HTTP only from My Public IP address.
In the case of the controller, it allows SSH only from My Public IP address.
And this example creates a very real static webserver.
It is a common practice to put Web servers into a private network and then provide a reverse proxy or load balancer between the web server and the internet. Private servers can not be directly accessed from the internet. To access a private server for administration, it is common to use a bastion-host (aka jump server) and the SSH to the jump server and from the jump server SSH into private servers.
This exercise uses only one public subnet and technically doesn’t require a bastion-host (aka jump server) for server administration. Creating a VPC with a private network requires a NAT gateway or NAT instances placed into a public subnet so that the private subnet can pull updates or download software from the internet. A NAT gateway will incur costs in AWS even with a Free Tier plan. Thus I’m writing this code to give an example of a jump server that can be used in a Free Tier exercise that will incur no cost.
The code for this VPC is the same as the previous exercise, and its code method is explained in the last exercise. You can copy the contents of the previous exercise and make a few changes to each file. There are two extra files in this exercise, the S3 policy file and the files for the static Website.
Or you can clone the code for this exercise from my Github repository.
VPC.tf
# --------- Setup the VPC -------------------------
resource "aws_vpc" "my-vpc" {
  cidr_block           = var.vpc_cidr
  enable_dns_support   = true
  enable_dns_hostnames = true
  tags = {
    Name  = "My VPC"
    Stage = "Test"
  }
}
# --------- Setup an Internet Gateway --------------
resource "aws_internet_gateway" "my-igw" {
  vpc_id = aws_vpc.my-vpc.id
  tags = {
    Name = "My IGW"
  }
}
# --------- Setup a public subnet -------------------
resource "aws_subnet" "public-1" {
  vpc_id                  = aws_vpc.my-vpc.id
  map_public_ip_on_launch = true
  availability_zone       = var.public_availability_zone
  cidr_block              = var.public_subnet_cidr

  tags = {
    Name  = "Public-Subnet-1"
    Stage ="Test"
  }
}

# -------- Setup a route to the Internet ----------------
resource "aws_route_table" "public-route" {
  vpc_id = aws_vpc.my-vpc.id

  route {
    cidr_block = "0.0.0.0/0"
    gateway_id = aws_internet_gateway.my-igw.id
  }
  tags = {
    Name = "Public-Route"
  }
}
# ---------- associate internet route to public subnet ----
resource "aws_route_table_association" "public-1-assoc" {
  subnet_id      = aws_subnet.public-1.id
  route_table_id = aws_route_table.public-route.id
}
Variables.tf
The code for variables.tf is almost the same as the previous exercise. The change to variables.tf is the addition of a variable for an AWS key pair and a variable for a Public IP Address.
You will need to configure the “ssh_location” with an IP address. The IP address will be your public IP address. If you don’t know your public IP address, open a browser and type into your browser’s address space, “what is my IP address” the browser will then show your public IP address. Change the variable setting to “your IP address with a /32” subnet mask. (i.e. “1.2.3.4/32”)
This exercise provides a connection to the new EC2 instance named “controller” using SSH. So be sure to create an AWS EC2 Key Pair within the region you will be using for this exercise, and update the variable “key” with your existing or EC2 key pair name. (i.e. an EC2 Key Pair name of testkey.pem becomes “testkey” for the name.
variable "region" {
    type=string
    description="AWS region for placement of VPC"
    default="us-west-1"
}
variable "vpc_cidr" {
    type=string
    default="10.0.0.0/16"
}
variable "public_subnet_cidr" {
    type=string
    default="10.0.1.0/24"
}
variable "public_availability_zone"{
    type = string
    default="us-west-1a"
}
variable "instance_type" {
    type = string
    default = "t2.micro"
}
variable "key" {
  type    = string
  default = "Your AWS Key Name for the region"
}
variable "ssh_location" {
  type        = string
  description = "My Public IP Address"
  default     = "1.2.3.4/32"
}
Main.tf
The code for main.tf in this exercise is almost the same as the previous exercise, except we are adding an EC2 instance named controller. Take note of the controller’s security group, which is using a new security group called “controller-sg.” We’ll discuss that security group in the Security_groups.tf discussion below.
Another change is the outputs. We are adding the “private_ip” of the web server in the outputs because we’ll need the private IP for an SSH connection by connecting to the controller and jumping from the controller into the webserver—output for the controller’s Public IP address.
Also, the controller has a unique “bootstrap-controller.sh” file. It doesn’t do much; it just runs a script for updating OS and apt packages upon launching the instance.
The “bootstrap-web.sh” is different from the first exercise. It runs an update & upgrade of the OS and apt packages upon launching the instance. The “bootstrap-web.sh” also installs Apache and AWS CLI and copies some files I’ve created for a static website from an S3 bucket into Apache’s folder /var/www/html.
provider "aws" {
  region = var.region
}
#Get Linux Ubuntu using SSM Parameter
data "aws_ssm_parameter" "ubuntu-focal" {
  name = "/aws/service/canonical/ubuntu/server/20.04/stable/current/amd64/hvm/ebs-gp2/ami-id"
}
# Creating Web server
resource "aws_instance" "web" {
  ami                    = data.aws_ssm_parameter.ubuntu-focal.value
  instance_type          = var.instance_type
  subnet_id              = aws_subnet.public-1.id
  vpc_security_group_ids = ["${aws_security_group.web.id}"]
  iam_instance_profile   = "${aws_iam_instance_profile.assume_role_profile.name}"
  key_name               = var.key
  user_data = file("bootstrap_web.sh")
  tags = {
    Name  = "Basic-Web-Server"
    Stage = "Test"
  }
}
# Creating controller node
resource "aws_instance" "controller" {
  ami                    = data.aws_ssm_parameter.ubuntu-focal.value
  instance_type          = var.instance_type
  subnet_id              = aws_subnet.public-1.id
  vpc_security_group_ids = ["${aws_security_group.controller.id}"]
  user_data              = file("bootstrap_controller.sh")
  key_name               = var.key
  tags = {
    Name = "Controller"
    Stage = "Test"
  }
}
output "web" {
  value = [aws_instance.web.public_ip, aws_instance.web.private_ip]
}
output "Controller" {
  value = [aws_instance.controller.public_ip]
}
Security_Groups.tf
Our code creates two security groups, “web-sg” and “controller-sg.”
The first security group, “web-sg,” allows HTTP into the webserver but only from your public IP address. The code establishes a rule that will enable SSH, but only from your IP address to the controller, and then allows a jump from the controller to the Web server. This makes our web server a bit more secure in any environment because it restricts who and how an admin can establish an admin session on the webserver.
Take note of the unique method of controlling ingress within the web security group “web-sg.” In the ingress section, I have replaced “cidr_blocks” with “security_groups.” This is basically stating any resource assigned to the security group “controller-sg” is allowed an ingress connection (in this case, SSH).
Using security_groups instead of a “cidr_block” as an ingress rule provides an excellent method of controlling ingress to our EC2 instances. As you know, assigning a “cidr_block” is setting a group of IP addresses. Most code examples published as examples, show an ingress of 0.0.0.0/0, allowing anyone or any device inbound access. Opening your inbound traffic to the entire internet into our test environment might be a very convenient way of writing code examples. Still, though, it most certainly is not a good practice.
As stated earlier, both EC2 instances in this exercise are in a public subnet and do not require a jump server. I prefer to write exercises that simulate potential real-world examples as early in the coding practice as reasonably possible. One of those practices is using a security group as ingress to web servers instead of a “cidr_block.”
AWS S3 is a great place to store standard code for a team to utilize as shared public storage. Therefore we are creating an S3 bucket that will hold our static website files. This code will copy the files from an S3 bucket into our web server content folder.
So, we’ll copy the website files into an S3 bucket. And create a profile that allows an EC2 instance to read and copy files from S3.
My Github repository has a file called “Static_Website_files.zip.” You are most certainly invited to unarchive the file and use it for your test website or create your static website files. Just know you’ll, of course need to unarchive the zip file contents before using the content.
s3_policy.tf
resource "aws_iam_policy" "copy-policy" {
  name        = "copy-anible-files"
  description = "IAM policy to allow copy files from S3 bucket"

  policy = <<EOF
{
  "Version": "2012-10-17",
  "Statement": [
    {
      "Effect": "Allow",
      "Action": ["s3:PutObject",
                "s3:GetObject",
                "s3:ListBucket"
            ],
      "Resource": ["arn:aws:s3:::change the name to your S3 bucket name",
                    "arn:aws:s3:::change the name to your S3 bucket name/*"]
    }
  ]
}
EOF
}


resource "aws_iam_role" "assume-role" {
  name               = "assume-role"
  description        = "IAM policy that allows assume role"
  assume_role_policy = <<EOF
{
    "Version": "2012-10-17",
    "Statement": [
      {
        "Action": "sts:AssumeRole",
        "Principal": {"Service": "ec2.amazonaws.com"},
        "Effect": "Allow",
        "Sid": ""
      }
    ]
}
EOF
}

resource "aws_iam_role_policy_attachment" "assign-copy-policy" {
  role       = aws_iam_role.assume-role.name
  policy_arn = aws_iam_policy.copy-policy.arn
  depends_on = [aws_iam_policy.copy-policy]
}


resource "aws_iam_instance_profile" "assume_role_profile" {
  name = "assume_role_profile"
  role = aws_iam_role.assume-role.name
}
Copy website files into the new S3 bucket
The AWS command-line interface is a quick way to get the files into the bucket. I have a file on Github that you can download and use as the files for the Website. Download and unarchive the file “Static_Website_files.zip” into a temporary folder and use the AWS S3 copy command to copy the files into the new bucket. Or use the AWS Management Console to copy the files into the bucket. Once you have the files in S3, the bootstrap user data of the EC2 Instance “web” will automatically install the website files in the apache folder /var/www/html from your bucket.
Configuration – reminders
Be sure to configure the following in variables.tf
Place your public IP address as the default IP for the variable “ssh_location.”
Place your regional EC2 Key Pair name as the default for variable “Key.”
Be sure to configure the S3 bucket name in s3_policy.tf
Don’t forget to create an S3 bucket and place the Website static files into the bucket
Don’t forget to place the “ARN” of the S3 bucket into the S3_policy.tf
Launching the VPC and Web Server
After installing the requisite software, requisite files, and configuring the variables.
Run the following commands in terminal
Terraform init
Causes terraform to install the necessary provider modules, in this case, to support AWS provisioning
Terraform validate
Validates the AWS provisioning code
Terraform Apply
Performs the AWS provisioning of VPC and Web Server
After Terraform finishes provisioning the new VPC, Security Groups and Web Server, it will output the Public IP address of the new public server in the terminal window. Go ahead and copy the IP address, past it into a browser, and you should see something like the image below:
Once you have finished with this example, run the following command:
Terraform Destroy (to remove VPC and Web Server)
It goes without saying, but it has to be said anyway. This is not for production!
All public websites should have some type of application firewall in between the Web Server and its internet connection!
It is a good idea to remove an EC2 instance when you are finished with the instance, so as not to incur costs for leaving an EC2 running.
Note: You don't have to install these requirements into your desktop. It is certainly quite feasible to use a virtual desktop for your development environment using tools like Oracle's virtualbox or VMware Workstation or Player, or Mac Fusion or Mac Parallels. Perhaps an AWS Workspace or AWS Cloud 9 environment.
We’ll create a very simple website using Terraform. It’s not really good from a production perspective, except to give a rudimentary and easy to read example of provisioning infrastructure and a website using Terraform.
I have placed all of the code in a GitHub, if you are not into typing all of the code. Her is the link: One_Public_Subnet_Basic_Web_Server
First setup a new folder. You can either use GIT to clone the code from GitHub or type in create your own files as show below:
VPC.tf
This file will create a VPC, we’ll give it a name, mark it as a “Test” environment and create one public Subnet and an Internet Gateway so that we can get Internet traffic in and out of our new AWS network.
It states that it is an AWS_VPC, then we provide the VPC IP address range.
A resource block declares a resource of a given type (“aws_vpc”) with a given local name (“my-vpc”). The name is used to refer to this resource from elsewhere in Terraform coding. The resource type and name together serve as an identifier for a given resource and so must be unique within a module. Within the block body (between { and }) are the configuration arguments for the resource itself. Most arguments in this section depend on the resource type.
Add a few Tags to most of your terraform resources, it is an excellent way of tracking AWS infrastructure and resources. Not really a big deal if this was to be the only VPC and a few resources. However “TAGS” become really important as an organization might have multiple test environments, multiple Development and QA environments and multiple production environments. By setting tags we can keep track of each project, the type of environment and recognizable names for the many systems. So a standard practice of adding meaningful tags, is a really good idea!
A bit of code to create an Internet Gateway
resource "aws_internet_gateway" "my-igw" {
  vpc_id = aws_vpc.my-vpc.id
  tags = {
    Name = "My IGW"
  }
}
We are coding a resource as a “aws_internet_gateway” and the reference name of “my-igw”. You can provide any name you wish to use. Just know that if you are going to make a reference to the internet gateway in any other terraform code, you must use the exact same name (referenced names are case sensitive and symbols like dash versus underscore sensitive).
The variables file for Terraform can actually have almost any name, names like vars.tf, my-vars.tf, my-variables.tf. You can even embed the variables within the VPC.TF file if you so desire, so long as the variables are declared in a file within the same folder. The most important element to learn is not just about the variables, but keeping sensitive variable data secure. Sensitive data should go into a file like “tvars.data”. And add “tvars.data” into the .gitignore file so that our sensitive variables doesn’t get posted in public github repository. Additionally, Hashicorp has a product offering called “Vault”. If multiple personnel are using the same Test, Development, QA or production environment, it is a recommended practice to protect sensitive variable data like AWS credentials, AWS Key names, and other sensitive data!
This is a very basic, non-production example with no sensitive data, so in this case we can create a variables.tf file without worry about keeping any data safe.
variable "region" {
    type=string
    description="AWS region for placement of VPC"
    default="us-west-1"
}

variable "vpc_cidr" {
    type=string
    default="10.0.0.0/16"
}

variable "public_subnet_cidr" {
    type=string
    default="10.0.1.0/24"
}

variable "public_availability_zone"{
    type = string
    default="us-west-1a"
}

variable "instance_type" {
    type = string
    default = "t2.micro"
}
That completes the variables file
Main.tf
Once again the name the name of the file is not important. We could call it MyWeb.tf or Web.tf. We could even put the VPC code, the variables code and the Web code, (all of the code), into one big file. Breaking up the code into separate files, just makes it modular coding that is reusable and easier to review.
provider "aws" { region = var.region}
Notice we are declaring the AWS Region in this block of code. WHAT? Shouldn’t this be declared when we created the VPC itself? Again, as long as it is declared, it almost doesn’t matter which file you place the declaration of AWS Region.
Notice also in this short bit of code:
We are stating the provider as “AWS”, this tells Terraform the backend code that will be downloaded from Hashicorp repositories in support of this instance of Terraform provisioning. It might also be a good idea to include the release of Terraform as a requirement within the code. Over time, Hashicorp changes and deprecated elements of Terraform. Such that over time, your code may no longer work if you pull down the “latest Terraform backend” from Hashicorp repositories.
Versioning Terraform Code
Code similar to the following might be a good idea:
terraform {required_version = ">= 1.04, < 1.05"}
This stipulates the use of Terraform version “1.04”, which is a representation of the version utilized when the code was tested and released. Future versions of Terraform may not work because of deprecation, but this version for sure works because it was tested using Terraform version 1.04.
I have not included this statement in my code, because after all, it is simply an example, not coding for any project or production system. We shall see if over time, something changes and it no longer works 🙂
Using SSM parameter to obtain AMI ID
data "aws_ssm_parameter" "ubuntu-focal" {
  name = "/aws/service/canonical/ubuntu/server/20.04/stable/current/amd64/hvm/ebs-gp2/ami-id"
}
You will see a tremendous amount of “Infrastructure as Code” declaring the AWS Image ID to use for an EC2 resource as something like ami-0d382e80be7ffdae5 for example. Sometimes it is hardcoded into the “aws_instance” block, or most times you’ll see it declared as a variable.
Sometimes a “Infrastructure as Code” creates a mapping (a list) of images where one of the images can be used dependent on the region. I’ve seen code where literally an AMI-ID is listed for each AWS region across the globe. Not unlike a phone book listing. This type of approach is used in Terraform, Cloudformation, Ansible, Chef and Puppet, most anywhere with provisioning with Infrastructure as Code.
This type of mapping of an ID per region, might be required. If for example, creating a custom “Golden Image”. It is not unusual to create and release an AMI ID as the gold standard to use for a deployment. The “Golden Image” is pre-configured with a specific version of Python, Apache or NGINX for example. The custom image is then stored as an EC2 AMI in AWS. To use as the AMI ID for a specific project(s) and you’ll need a different image ID depending on the region.
I have already created and will be posting in the near future, examples of scalable web servers. Using a custom AMI image with specific versions of Python, Apache2 and another AMI for MySQL backends. In those examples, I will be using a specific “golden image” with versioning and release statements.
For now though, I just need the latest version of Ubuntu server. You can see a good write up on how to pull a specific Ubuntu image. You’ll find the document by Ubuntu, at this link: Finding-ubuntu-images-with-the-aws-ssm-parameter-store.
This method is a Terraform code that connects into AWS API to “Get Data”. In this case an aws_ssm_parameter. And specifically in this case getting an image for Ubuntu server 20.04 stable release.
This bit of code will get the AMI ID, for the AWS Region specified earlier.
I could’ve just as easily have gotten an Amazon Linux 2 AMI ID as follows:
data "aws_ssm_parameter" "linuxAmi" {
  name     = "/aws/service/ami-amazon-linux-latest/amzn2-ami-hvm-x86_64-gp2"
}
Caution: Do not use an Amazon Linux example above because the bootstrap.sh, User Data (see below) is specifically using Ubuntu server commands language . Make sure to sure to use the UBUNTU SSM Parameter above. I am simply demonstrating that you can get other Linux kernels, using the same process.
Now we are calling for the creation of an AWS Instance with the name “web”
In the AWS resource block, we’ll need to stipulate at the very least an AMI-Id, the instance type, the subnet placement and a security group.
In this case we are using the AMI-Id pulled earlier. ami=data.aws_ssm_parameter.ubuntu_focal.value. Where “ubuntu_focal” is referencing the bit of code that pulls the code from AWS.
 data "aws_ssm_parameter" "ubuntu-focal" (this pulls the AMI-ID data from AWS - line 8 of this code)
 ami= data.aws_ssm_parameter.ubuntu-focal.value (this uses the AMI-ID Value that was pulled from AWS in line 8)
The instance type will be a t2.micro (free tier) referenced in the variables.tf file. The subnet references the subnet created in VPC.tf that is named “public-1”. The security group is referencing the security group created in “security_groups.tf” (see the next section below).
User Data
User data is a bit of code that executes within the AWS Instance itself. In this case, code the Web server executes when it is first built by Terraform provisioning. There is a number of ways to write this script which executes when the AMI instance is launched. We could write the script like this:
Or we can put the script into a file and call the file itself like this:
user_data = file("bootstrap.sh")
For this example we are using the “bootstrap.sh” example. Technically we can use any name, so long as the script itself is properly coded. We could use “boot.sh” for example.
Add some tags and we are near complete with this file.
The final lines, is an instruction for Terraform to output AWS data. The Terraform code use the AWS API to pull data about our new Web server and display that data in the terminal when Terraform completes provisioning our infrastructure. In this case we want only the public IP
output "web" { value = [aws_instance.web.public_ip] }
Note: If you leave off the last bit, “public_ip” the output will display all of the known data about the new web server. However, as can be seen in future examples, being specific about output data makes it referenceable in other Terraform modules. So in this case we want the public_IP.
That completes the Main.tf file
Lastly, Create the security_groups.tf file
Security groups resource “aws_security_group” at the very least requires a name, in this case “web-sg”, the vpc_id and an ingress rule and egress rule. Once again, about the Name of the resource, it is important to remember, that referencing the security group the name itself is case sensitive and it symbol sensitive like dash instead of underscore.
Note: The variables do not have to be changed if you are ok with running a new VPC and Web server out of US-West-1 region
Once the requirements stated above are installed, and the VPC.tf, main.tf, security_groups.tf and variables.tf are created in the same folder you are ready to launch. Or, you can simply clone the GITHUB repository into a folder.
Edit the variable for your choice for AWS Region (currently, the default is “us-west-1”).
Edit the CIDR blocks if you want to use different address range for your new VPC
Edit the Instance type if you want to use a different instance type (note t2.micro is the only one you can use for free tier)
Launching the VPC and Web Server
After installing the requisite software, requisite files and configured the variables.
Run the following commands in terminal
Terraform init
Causes terraform to install the necessary provider modules, in this case to support AWS provisioning
Terraform validate
Validates the AWS provisioning code
Terraform Apply
Performs the AWS provisioning of VPC and Web Server
After Terraform finishes provisioning the new VPC, Security Group and Web Server, it will output the Public IP address of the new public server in the terminal Window
Open a browser and you should see the welcome to nginx as shown below:
Clean up
Once you have finished with this example run the following command:
Terraform Destroy (to remove VPC and Web Server)
It goes without saying, but it has to be said anyway. This is not for production!
All public websites should have some type of application firewall in between the Web Server and its internet connection!
It is a good idea to remove an EC2 instance when you are finished with the instance, so as not to incur costs for leaving an EC2 running.
When considering purchasing a new system for a business, there are good questions to ask about the new system:
What is the yearly capital expense and operating costs?
What and when is the return on investment?
Does the system have the capability to meet our requirements?
How will the new system integrate into our business?
What impact will the new system have on our business:
Do we have the capacity to support a new system?
Support, engineering, maintenance, backups, storage, etc.
How will the new system impact other systems?
Will it require training
Have we reviewed and considered competitive products?
Can we evaluate the product before purchase?
Should we assess other products before the decision to purchase?
Standard practice
How do we answer these questions before investing in a new product. My answer is that we create a conceptual architecture, create a cost model, and perform a product evaluation before purchase. No matter the size of a business, it is probably a good idea to evaluate a product before delivering a new system into the business. It is my recommendation to have standard practice that will answer the above questions, test and evaluate new products before purchasing a new system. Standard practice prevents mishaps, misconfigurations and increases efficiency of delivery and utilization of new systems.
More about standards
At some point in our history of IT, Enterprising managers realized the need to create business standards. So they got together to develop and establish best practices like ISO 9001, CMM, CMMI, ITIL, and ITSM. Architects also realized a need to create common architecture frameworks, for example, Open Group Architectural Framework, Zachman Framework, Federal Enterprise Architectural Framework, and TOGAF.
There is a naïve thinking that just by being agile, an architecture will gradually emerge, out of bi-weekly refactorings. This belief was amplified by a rather poorly worded principle #11 in the agile manifesto, which states that:
“The best architectures, requirements, and designs emerge from self-organizing teams.”
and cemented by profuse amount of repeated mantras like: YAGNI (You Ain’t Gonna Need It) or No BUFD (No Big Up-Front Design), or “Defer decision to the last responsible moment”. (This principle is neither prescriptive, not can it be tested, as Séguin et al. showed in […], so it is probably not a principle, but merely an observation or a wish.)
I personally agree that it is naive to believe architecture, requirements and design eventually emerge from teams! Seriously, read the link provided about architecture technical debt. Perhaps you’ll agree that it would be a good practice to include architectural review on a regular basis alongside of today’s agile teams.
Another good article to read, can be found at scaledagileframework.com. Today there is a constant appetite for DevOps and an Agile framework of managing deployments. Scaled agile Framework recommends providing additional practices into agile planning. We shouldn’t be so quick to thinking design is an eventual outcome of agile development and that we need to have regular business and architectural reviews during product development. Please read this article: Architecting really big IT and cyber-physical systems?
Understanding basic concepts of architecture, is the reason I’m writing this article. Please see the diagram below that is my method to represent the architecture stages of a new system that will incorporate a commercial of the shelf system (COTS) using a waterfall approach. Development and design using Agile development processes will have a different architectural approach and will be discussed in another Blog post.
A small business might have less stringent requirements regarding the architectural process. It might combine the stages depicted in the diagram below into smaller iterations of documentation but will still reap benefits by establishing a standard practice.
Architecture practice for commercial products may also need to consider other architecture disciplines. For example, if a large global corporation has many business systems in different regions, management of distributed systems requires service architecture and management overview of the many systems. Architects could produce a service architecture by defining the relationship and integration of COTS products as services. Placing the systems into categories, methods of integration, dependencies, and other service-oriented documents.
Business Plan Goals, objectives, requirements, business process, Workflows
Conceptual Architecture System constructs, relationships, organization, strategy
Proof of Concept Review products, down select products, Test products & test results
Logical Architecture Capabilities, Logical constructs, logical diagrams, service levels, Abilities
Operations Deployment model and installation guides
Reviews Scheduled reviews of capacity performance and architectural design
The business plan
Most new systems are born from a business goal, a functional requirement, or a need for business improvement. A business plan most often arises during a conversation. Sometimes in the elevator or by email. Perhaps a discussion at the water cooler. Concepts occur in a meeting or on the back of a napkin. No matter how a concept is born, someone takes the reign and runs with the idea.
Almost always, the questions become:
*What will it cost? *What is my return? *When can the objective or goal be achieved? *How does this impact the business? Why can’t I have this in place tomorrow?
Conceptual Architecture
Conceptual Architecture to the rescue.
The primary purpose of conceptual architecture is to convey the concepts of a new system or systems in a non-technical manner, and present the architecture with business acumen instead of technical jargon. Conceptual Architecture is a method for stakeholders to understand and agree to new business systems.
Joseph O’Mara
Concept architecture is a business-minded perception of goals and objectives. Ideally, concept architecture is not technical and does not come to conclusions on a product or solution. Instead, concept architecture brings together an agreement of the goals, objectives & requirements, primarily to agree conceptually what will become a new business system.
Instead of architecture on the back of a napkin, an architect gathers the requirements and presents the conceptualization to stakeholders so that everyone can agree; YES, that is what we want to accomplish.
A small business IT manager might put together a few diagrams, some assumptions, the understanding of requirements, and perform a quick presentation to agree on the new system conceptually.
Larger businesses most likely will have a template for conceptual architecture. A Conceptual Architecture template will assure critical elements of architecture considerations are captured and agreed amongst stakeholders.
A conceptual architecture template would convey the essential aspects of a new system by presenting:
conceptual diagrams
business purpose, goals & requirements
objectives and potentially phases to achieve objectives
Location: On-premise, Hybrid, Cloud environment, regions, data centers
Service views: What is the new system & its intended relationship to other services
System Integrations
Potentially where it fits into business processes or workflows
How will the new system consume or produce, and secure data or knowledge property
Proof of Concept
Proof of Concept provides the ability to get past the hype. Most products provide market hype (i.e. This product will save money, while solving world peace). Proof of Concept brings the product into a lab, performs tests against requirements and measures its capabilities. Does the product actually achieve the marketed hype? More importantly, does the product meet our requirements?
Joseph O’Mara
Once concept architecture has agreement amongst stakeholders, we move to a phase where IT reviews the potential new system and its ability to meet requirements. Reviewing requirements and capabilities sometimes require the creation of a capability matrix. Perhaps a cost model is produced as well. If reviewing several products as candidates for use as the new system, costs and capabilities will be matrixed to compare products. A capability matrix and cost model enable IT to choose which product to evaluate by estimating the competitive product’s cost and abilities. It is not uncommon to work with a salesperson, pre-sales engineers, and pre-sales architects to understand how a product will meet desired capabilities—and what is involved in deploying and supporting the new system, including an estimate of the cost to maintain and deploy.
Once finishing a paper review of potential products for the new system, an evaluation is in order. By selecting one or two products to evaluate, we then move into an evaluation phase. We coordinate with the vendor(s) a trial license and assess the product in a test environment..
It is not uncommon to have a simple logical and technical design prepared for a test environment, making sure to approximate our plan to implement in production as best as possible.
The next step is a test plan. An evaluation should include other systems that simulate production. Especially if any integrations & dependencies are required as part of the solution. Additionally, have the support and maintenance aspects of production included in the plan. The plan should include dependencies like security integration, database integration, and data feeds. The test plan should consist of users and administrators and any other roles that might be necessary for testing. Including actual users, administrators, and managers into the test program most often can work out the kinks in a new system before deployment. Potentially finding a break/fix element of the product that forces a decision not to purchase that product for your business. Or potentially finding aspects of cost not considered.
Once the testing is complete, the cost model, the capabilities matrix, the test plan, and test results are delivered to stakeholders to reach an agreement. They will decide if it makes sense to continue with implementing the new system. Most importantly, everyone agrees conceptually to invest in a new product for the business.
Logical Architecture
Once everyone agrees conceptually to a new product, its cost estimates, and expected objectives, it’s time to figure out how the new product will fit into production. Sometimes the move into production is simple, and sometimes it can be complicated as the new system may need to integrate with other systems. An architect works out how a system integrates or operates alongside other business systems.
A logical architecture usually represents a singular system architecture. A solution architecture is created when multiple systems each representing a different service are being introduced into a business. Service architecture represents service integration, concentrating on services, interfaces, data flow, and other considerations. Service architecture typically describes a system as a service that is part of a discipline. For example, Active Directory is an identity and authorization service that is a part of a Security Discipline.
Logical architecture is an abstract method of representing new systems. The different architectures (logical, solution, or service) create “Abstract” constructs.
For example;
Logical diagrams, functional diagrams, service diagrams but not physical diagrams
Description of the system, its purpose and functionality
Perhaps including modules of the system if it’s logically important to understand module location and function (i.e. database vs front end web server)
location geographically or data centers or different corporate buildings, or perhaps even global regions, but not the physical location within a business (i.e., in a closet or a specific area of the building)
Who is using a new product, like finance or manufacturing
Roles if necessary, IT management vs. user roles
Network: internet-facing product will be in a DMZ, but not the technical details of that DMZ
Backup method and schedule (logically) without the technical details
Maintenance windows and SLA statements without the actual maintenance plans
A logical architecture will also construct the “ABILITIES”. What is meant by “Abilities”? “Abilities” is the operational considerations of managing, maintaining and servicing technology.
Abilities
Capability
Reliability
Scalability
Recoverability
Maintainability
Measurability
Expandability
Logical, solution, or service architecture will not only stipulate the “Abilities” of the new system, but also strive to construct a level of service acceptable to the business by defining service level agreements (SLA) and how the architecture will achieve the SLA
Technical Architecture
Technical (or physical) architecture is a little dubious these days, as automation and virtualization have reduced the need to understand the physical installation of new products. At one time, introducing a new system into a data center took much consideration. Things like power consumption, rack space, network wiring, network design, connections to storage, and backups were all considerations for installing a new system physically. Data Centers still need to worry about power, racks, wiring, storage, and networks but are usually considered private or public cloud infrastructure considerations.
Technical architecture in a business with a hypervisor farm will document the technological constructs of virtualization and its sizing of a virtual server(s). Details such as network rules, load balancing rules, roles and responsibilities, maintenance plans, backup plans are part of technical architecture. Technical architecture is where the rubber meets the road, so to say!
Technical architecture documentation is less about the power, wires, and racks with automated infrastructure and more about the coding and parameters of infrastructure with automated infrastructure tools such as VMware SaltStack, AWS Cloudformation, Google Cloud Deployment Manager, and Azure Resource Manager as examples of infrastructure automation. Another infrastructure provisioning tool is Hashicorp Terraform, which does a great job creating code to provision VMWare, AWS, Google, and Azure platforms. These tools are considered Infrastructure as Code, and many consider this a great way of documenting the technical architecture because Infrastructure as Code itself can be archived and is itself a document of the provisioned system(s).
To create a bucket, you must register with Amazon S3 and have a valid AWS Access Key ID to authenticate requests. By creating the bucket, you become the bucket owner.
Not every string is an acceptable bucket name. For information about bucket naming restrictions. See Bucket naming rules
Step 1 – Choose where you want to run AWS Command Line Interface (CLI)
There are several methods to using AWS CLI
My Choice – Install prerequisite utilities and AWS CLI on your desktop or laptop.
An alternate method – Use AWS Cloud9. An EC2 instance is created and configured by the AWS Cloud9 service. Cloud9 configuration of an EC2 instance comes with the prerequisite utilities and AWS CLI already configured for use within your AWS account. Cloud9 may require enabling the AWS Toolkit in Cloud9 to manage some services. The welcome screen discusses why and how to use the toolkit). AWS Cloud9 is free to use for new accounts using the Free Tier option.
Another method – Create a virtual machine locally, then install the prerequisite utilities and AWS CLI installed into the virtual machine.
For Windows machines – Virtual Box, VMware Workstation, or VMWare Player.
For Mac’s you can use Virtual Box, VMware Fusion or Parallels desktop
For Linux machines use Virtual Box or VMware Workstation Player
Another method – Use a Docker Container and run CLI from the container
Another tool to possibly use is Dockers Dev Environment which at the time of this writing is in Preview Mode, I haven’t tried the preview yet.
Note: A fun activity is using Hashicorp/Vagrant to automate the installation and configuration of virtual machines. Creating a standard Dev. Environment amongst developers. By using Vagrant the vagrant file (script) creates and configures a virtual machine exactly the same way on Macs, Windows and Linux machines, using Vagrant and Virtualbox. Thus, assuring everyone is using the same version of Python for example! Vagrant does work with VMware Workstation or VMware fusion (at cost).
Note2: Another fun activity is using HashiCorp/Packer to create and create a standard Docker Image for developers to use as a standard docker image. Like Vagrant, Packer scripts the creation of an image, and the installation of specific versions of the requisite utilities for AWS CLI. An example, is to use these specific version of AWS CLI and Python (aws-cli/2.1.29, Python/3.7.3) when creating and configuring a docker image.
Note3: Both Vagrant and Packer use "provisioners", a built in command to configure a virtual machine or docker image. I personally like to use Hashicorp/Ansible for the configuration, in my opinion Ansible is more intuitive, easier to use, more immutable and declarative as a configuration tool.
The primary difference between Vagrant and Packer, is that Vagrant creates a Virtual Machine, whereas Packer creates a Docker image. A Virtual Machine can perpetually save all of the local files by simply suspending a virtual machine when finished for the day, whereas Docker images needs to map to a local directory for persistent storage. I like using a virtual machine (possibly even with shared folders), but that is my old school methods getting in the way perhaps 🙂
The Difference in the alternatives above
The primary difference between installing AWS CLI on your desktop or laptop or using one of the alternative methods above is all about controlling your utility versions. An Example, two members of a team, use AWS CLI installed on their desktops. Team member “Tom Jones” is running AWS CLI Version 1 with Python Version 2.7, and member “John Thomas” is running AWS CLI Version 2 with Python Version 3.8. Different versions behave differently, what Tom can or can’t accomplish, most likely will be a different experience than John’s.
Cloud 9, Virtual Machines, or Docker Images, can and should have specific versions of utilities maintained by agreement amongst members of the team. Everyone will be able to accomplish the same tasks, share the same git repositories, etc., with the assurance of the same experience and outcomes.
Step 2 – Install and configure AWS CLI
This topic provides links to information about how to install, update, and uninstall version 2 of the AWS Command Line Interface (AWS CLI) on the supported operating systems.
Note: the above instructions are links to AWS documentation. I’m planning on writing up the use of Packer for Docker and Vagrant for virtual machines along with Ansible configurations, as future posts.
Step 3 – Create a Bucket
When you have configured your AWS CLI environment, you should be able to run the following command.
Connect into your EC2 instance: Goto Amazon’s EC2 connect guide as they have a great documentation on your choices of how to connect into an EC2 instance.
cd /var/www/html
echo "<html><h1>Hello from Your New Web Server</h1></html>" > index.html
sudo chown  ec2-user /var/www/html
sudo chmod -R o+r /var/www/html
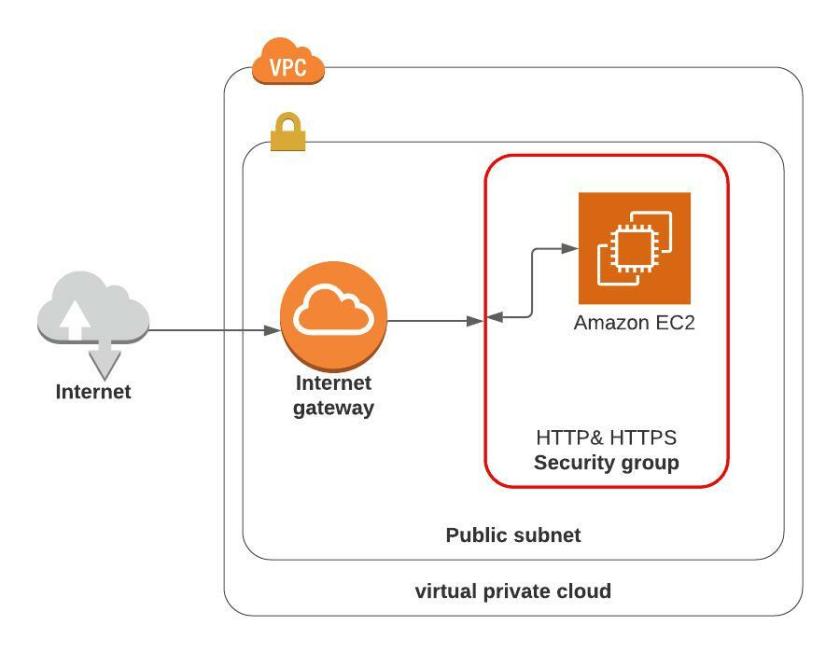
Assuming that the HTTP & HTTPS security group has already been created, it needs to be assigned to this EC2 Instance
Click on Instances Running in the Resources section
Select the EC2 Instance and then Click Actions button
Within the drop down menu choose to expand Security
Select Change Security Groups
In the Associated Security Groups, click in the “Select security groups” box Note: I don’t understand why the User Interface (UI) shows the “Select security groups” as though it is greyed out, but there you have it, click in that box, and a drop down of available security groups will be shown
If you followed the module Create HTTP and HTTPS security Group you should have a security group named “HTTP & HTTPS”, select the HTTPS & HTTPS security group and the box will change to the actual ID of the security group ID
Then click Add Security Group
Then click Save
Open a browser window and enter the URL to access the Web Server (it is the public IP address of the EC2 instance).
Note: get the public IP address from the EC2 Management console Instance details
You should see the following:
Caution: It is a good idea to remove an EC2 instance when you are finished with the instance, so as not to incur costs for leaving an EC2 running.
It goes without saying, but it has to be said anyway. This is not for production!
All public websites should have some type of application firewall in between the Web Server and its internet connection!
As well it should be monitored and have event and incident management in place. The list of things that will make a better architecture for a web site continues! However, enough said at this time!
This assumes you have left the default VPC in place or that you have created your own VPC with a public network. Also, be sure to select the region you want to create a EC2 instance.
To launch an EC2 instance
Sign in to the AWS Management Console
Choose the region you wish to launch
Choose EC2 Dashboard, and then choose Launch instance
Choose the Amazon Linux 2 AMI
Chose the t2.micro instance type (free tier)
Click next to configure instance details
Network: Choose the VPC with a public subnet (either default VPC or one you’ve created)
Subnet: Choose an existing public subnet
Auto-assign Public IP: Choose Enable
Choose next to configure storage
Keep the defaults and add a tag of your choosing:
example: Key = “Name” and Value = “Test Server”
Choose next to configure Security Group (or if you have already created a security group to allow SSH, then choose existing security group)
Keep the defaults for SSH connectivity (except change source by clicking the down arrow and choosing My IP, unless you want it open to the public then 0.0.0.0/0 will work just great)
Click Review and Launch
On the Review Instance Launch page, shown following, verify your settings and then choose Launch
Select an existing key pair or create a new key pair page
To Create a new key pair and set Key pair name to any name you would like: for example, “TestKey” or perhaps “EC2Key”. Be very sure to Choose Download Key Pair (you will be using this key for connectivity potentially for all of your AWS exercises) , and then save the key pair file on your local machine. You use this key pair file to connect to your EC2 instance.
To launch your EC2 instance, choose Launch Instances
Choose View Instances to find your instance.
Wait until Instance Status for your instance reads as Running
To Connect into your EC2 instance: Goto Amazon’s EC2 connect guide as they have a great documentation on your choices of how to connect into an EC2 instance.
UPDATE YOUR EC2 INSTANCE
Once connected, run a linux update
sudo yum update -y
There ya go, launched and updated an AWS virtual server in just a few minutes
Next Steps
Perhaps you would like to Create a Web Server, if so ahead and go to the next module.
Caution: It is a good idea to remove an EC2 instance when you are finished with the instance, so as not to incur costs for leaving an EC2 running.